Mudi 7 (GL-E5800) Benutzerhandbuch
Produktübersicht
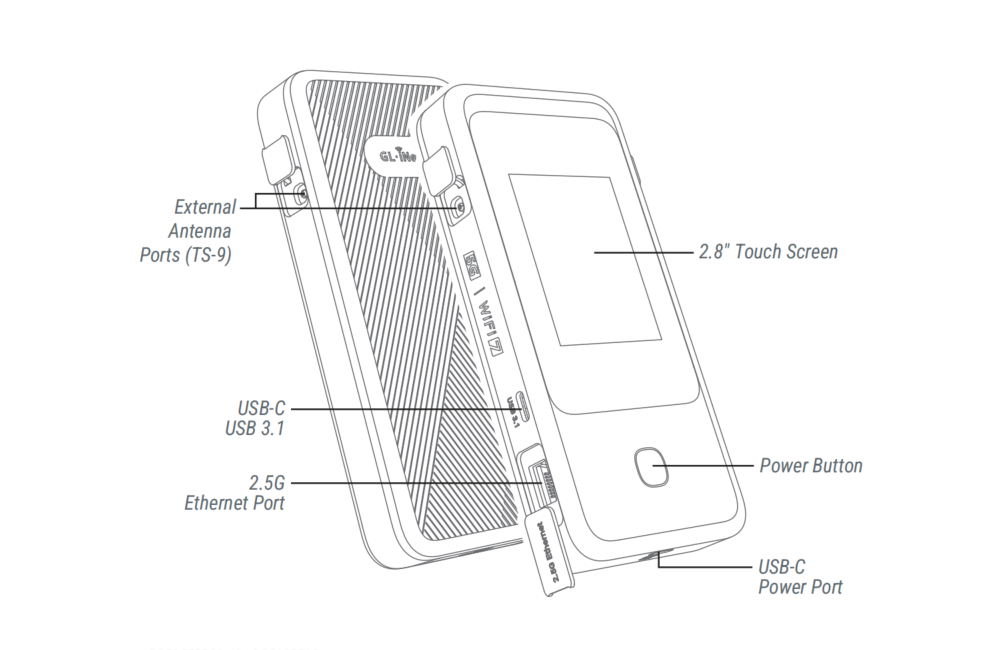
Mudi 7 ist ein tragbarer 5G-NR-Wi-Fi-7-Reiserouter für Vielreisende und Geschäftsanwender, der zuverlässige private Netzwerke bereitstellt, um Daten vor Cyberbedrohungen zu schützen. Er bietet 5G-Hochgeschwindigkeit, automatisches Umschalten zwischen zwei SIM-Karten (Failover) sowie Wi-Fi 7 mit 320-MHz-Kanälen und 4K QAM für stabile und schnelle Verbindungen. So werden schnelle Downloads, 4K-Streaming und verzögerungsfreie Videokonferenzen auch in stark frequentierten Bereichen unterstützt.
Dank des Touchscreens können Sie mit dem Mudi 7 die Datennutzung in Echtzeit, die Signalstärke, verbundene Geräte und Client-Geschwindigkeiten überwachen und Einstellungen per Fingertipp anpassen, für eine intuitive und unkomplizierte Bedienung.
Lieferumfang
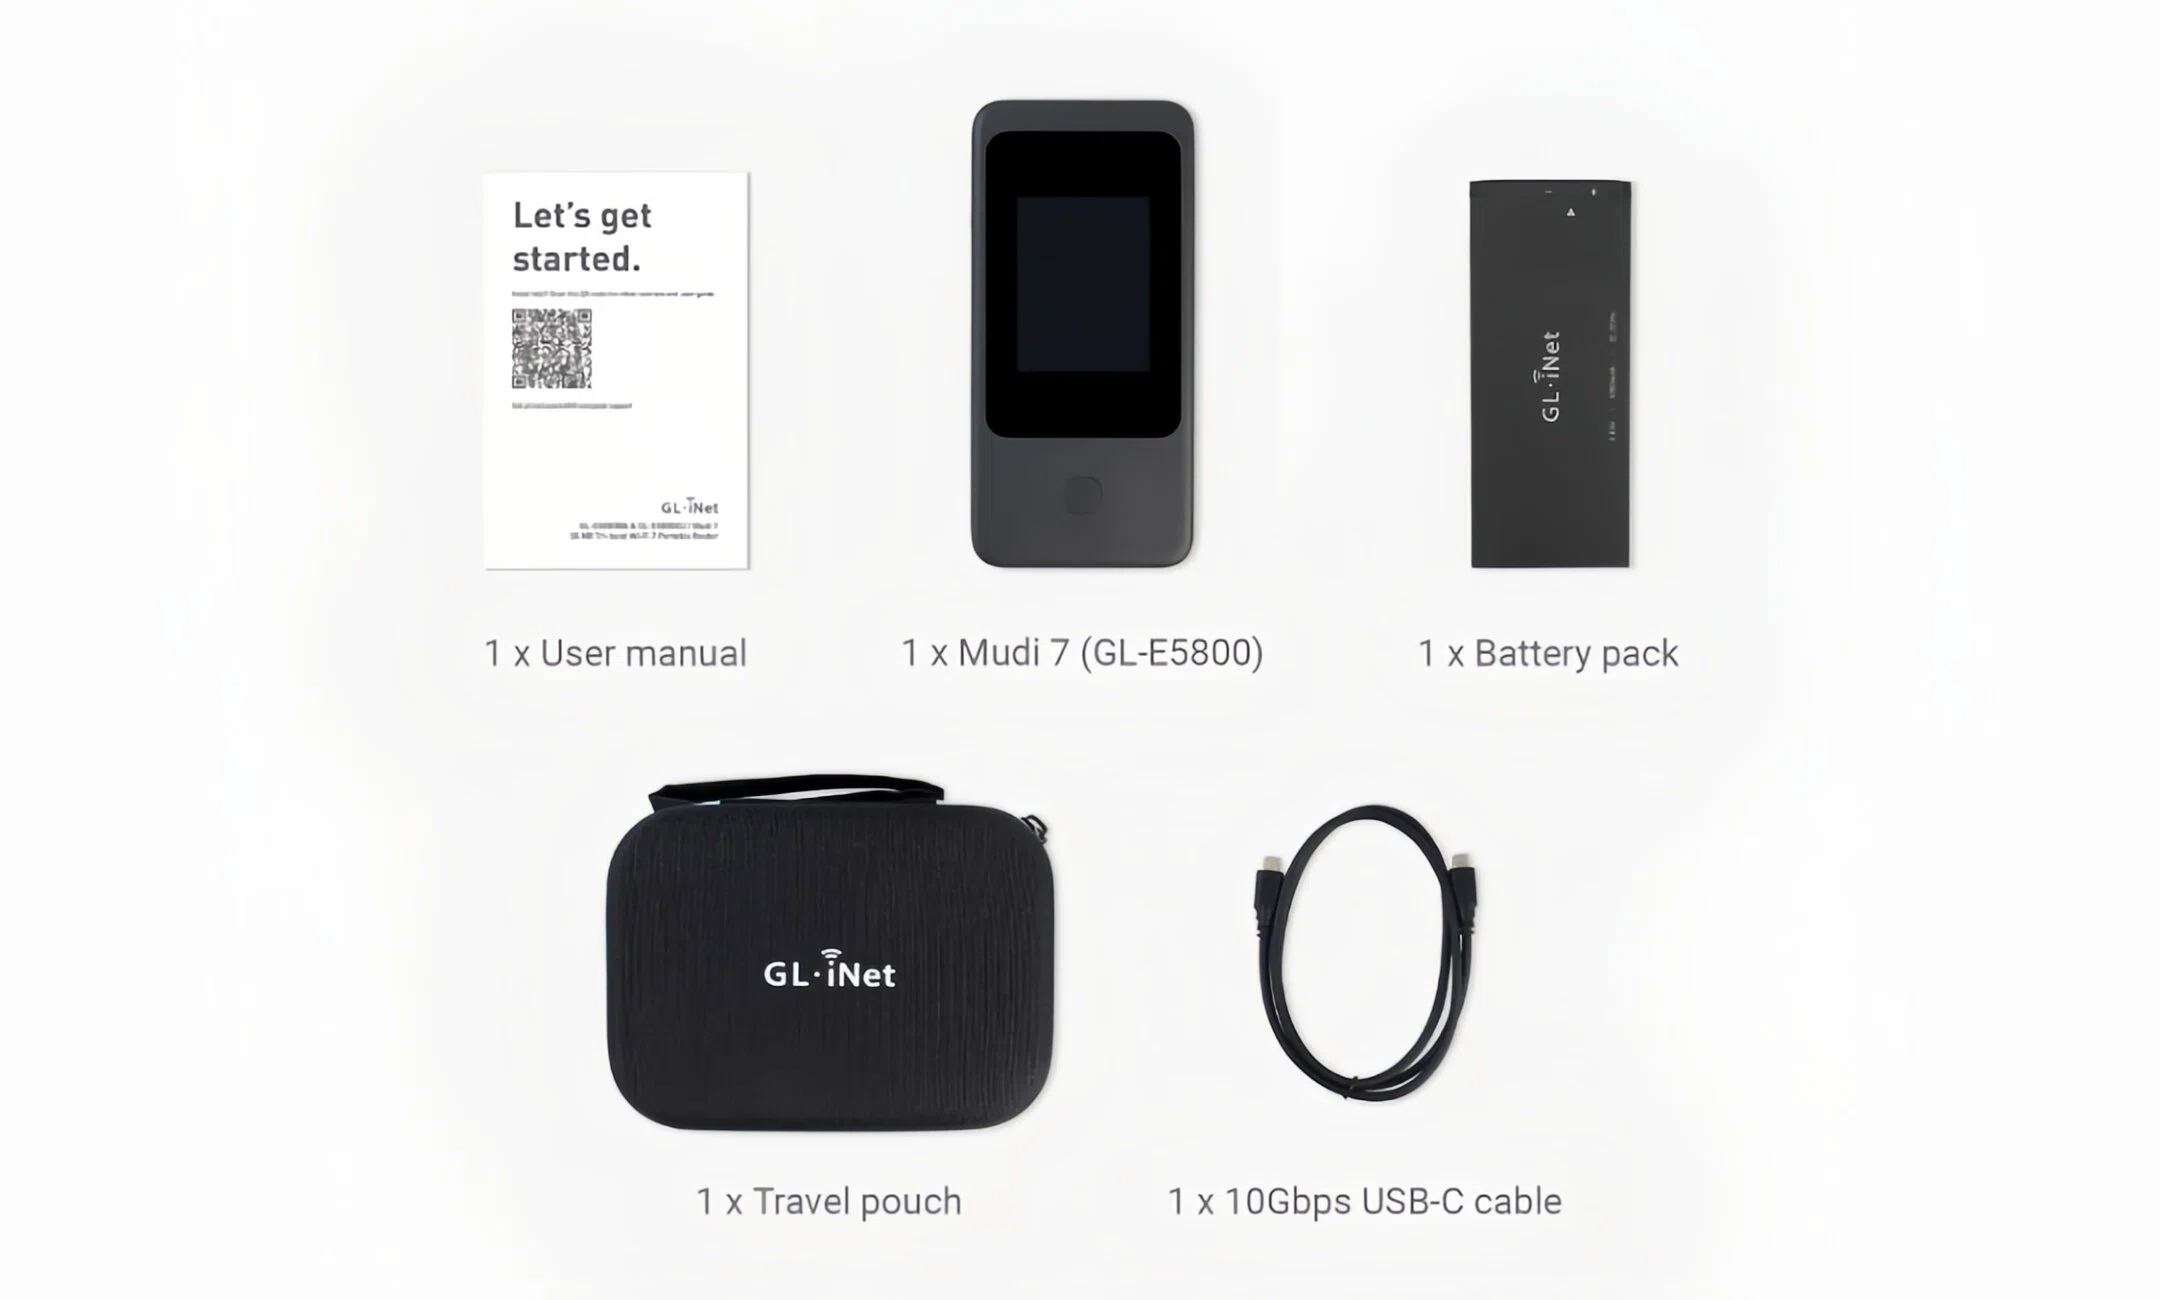
- 1 x Mudi 7 (GL-E5800)
- 1 x Akkupack
- 1 x 10-Gbit/s-USB-C-Kabel
- 1 x Reisetasche
- 1 x Benutzerhandbuch
Sehen Sie sich unten das Unboxing-Video von Mudi 7 an.
So richten Sie Mudi 7 ein
Sehen Sie sich dieses Einrichtungsvideo an oder folgen Sie den untenstehenden Schritten.
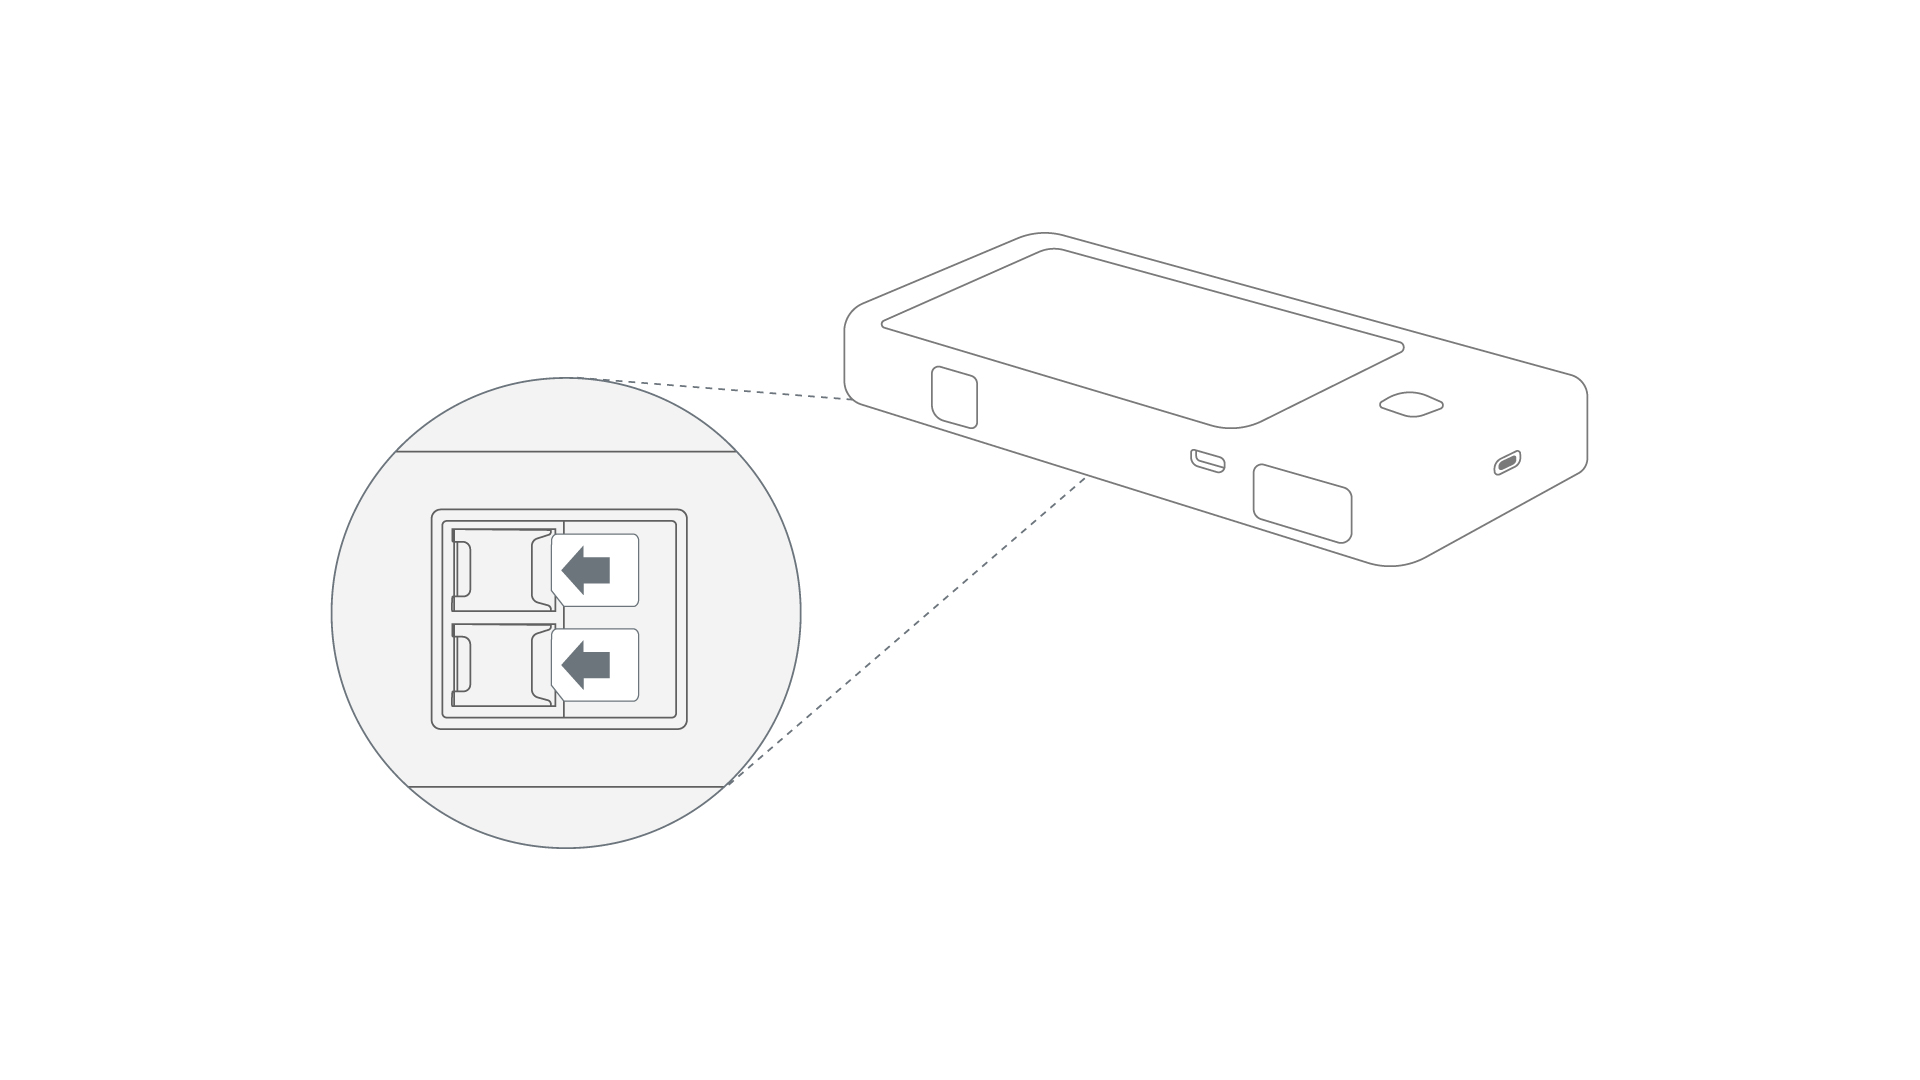
1. SIM-Karte einsetzen
Setzen Sie Nano-SIM-Karte(n) in Ihren Mudi 7 ein. Wenn Sie lieber eSIM verwenden möchten, überspringen Sie diesen Schritt und fahren Sie mit Schritt 2 fort.
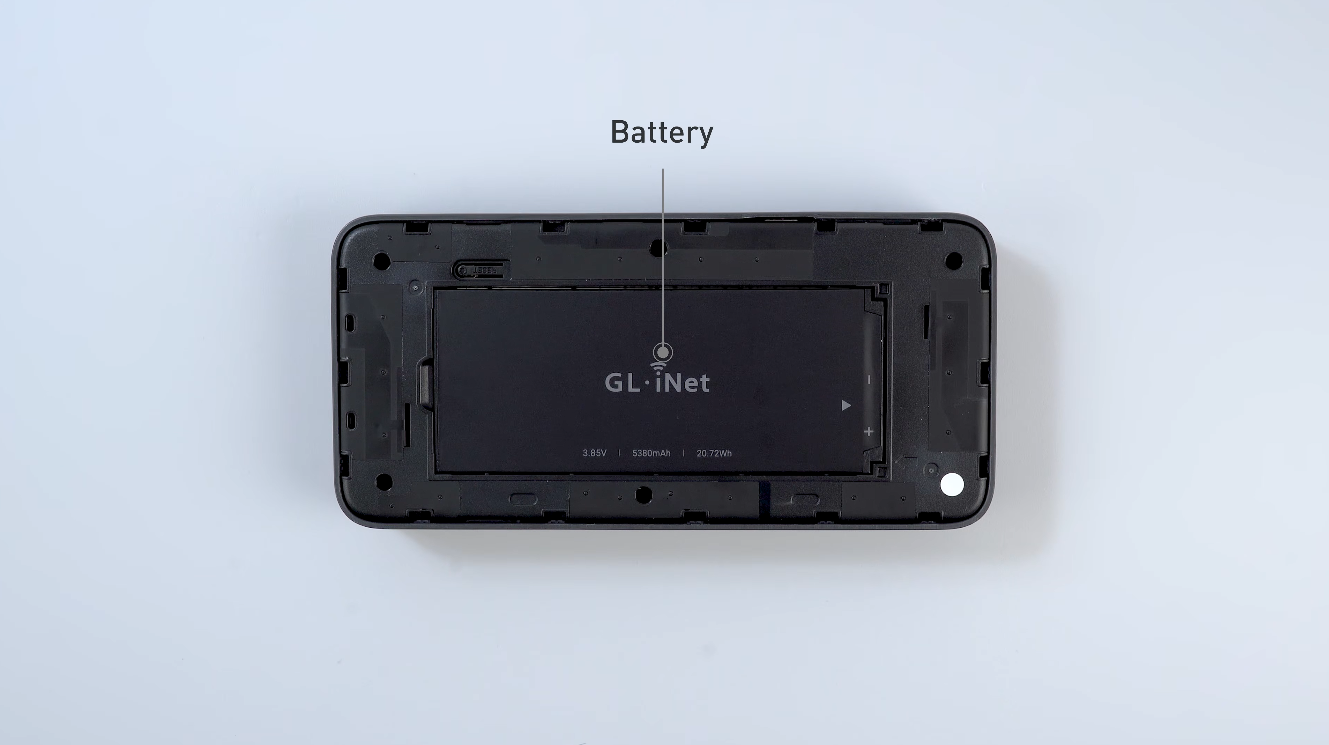
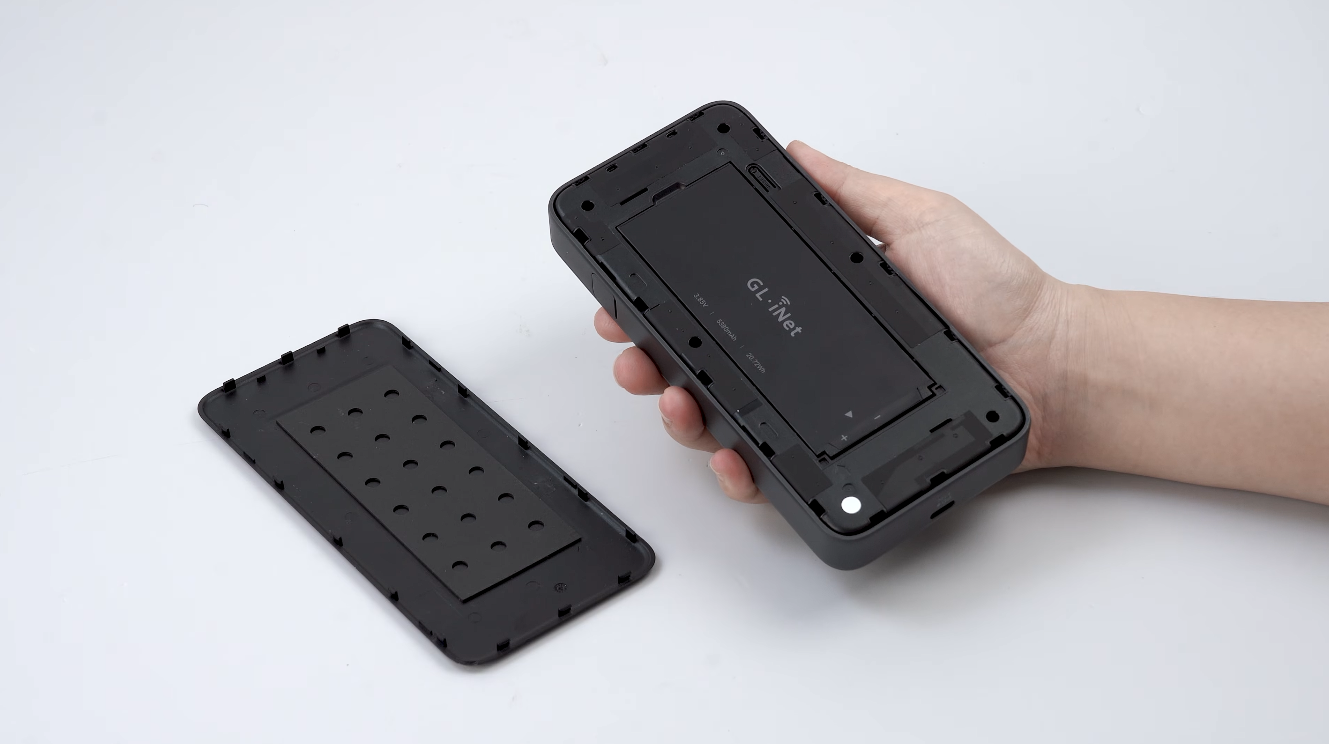
Nutzen Sie zuerst die kleine Kerbe unten rechts an der Rückabdeckung als Hebelpunkt. Hebeln Sie entlang der Fuge, um einen Spalt zu schaffen, öffnen Sie dann die Rückabdeckung und nehmen Sie den Akku des Mudi 7 heraus.
Setzen Sie als Nächstes die Nano-SIM-Karte(n) ein. Wenn Sie nur eine Karte verwenden, nutzen Sie bevorzugt SIM 1.
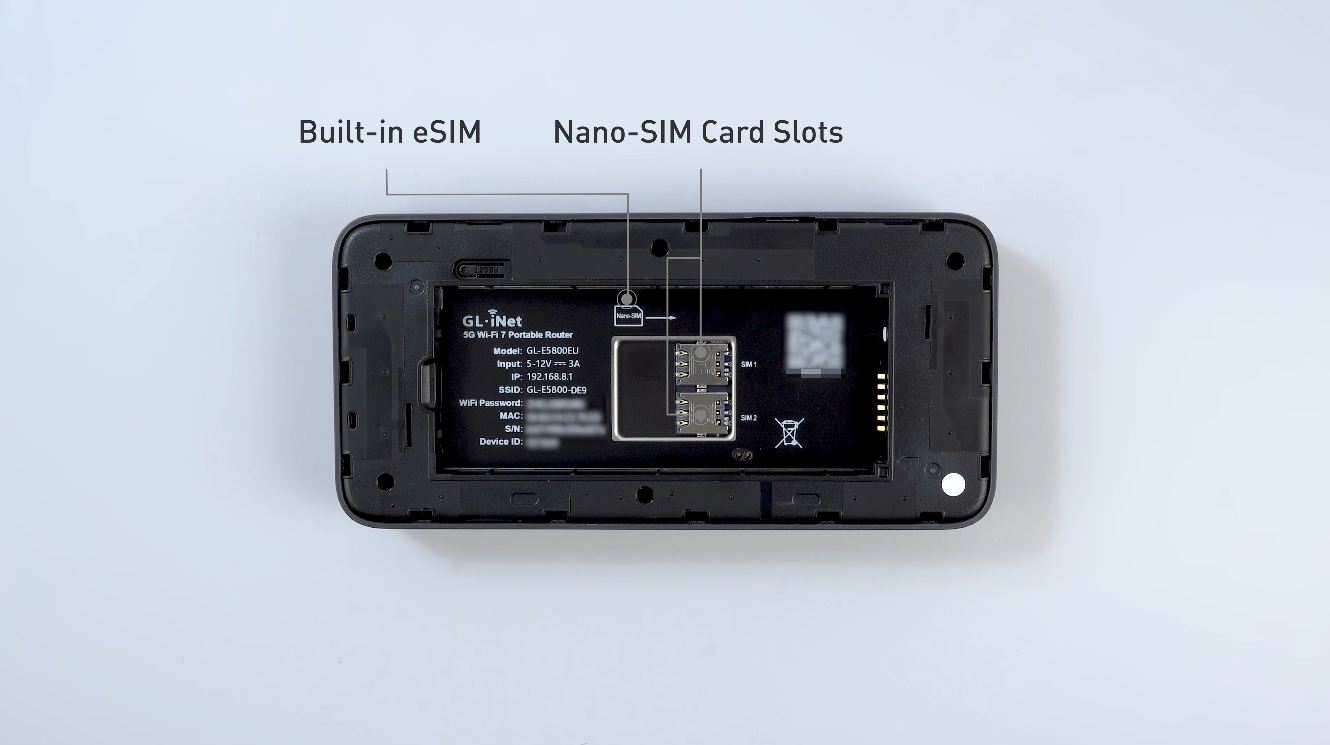
Setzen Sie abschließend den Akku wieder ein und bringen Sie die Abdeckung wieder an.
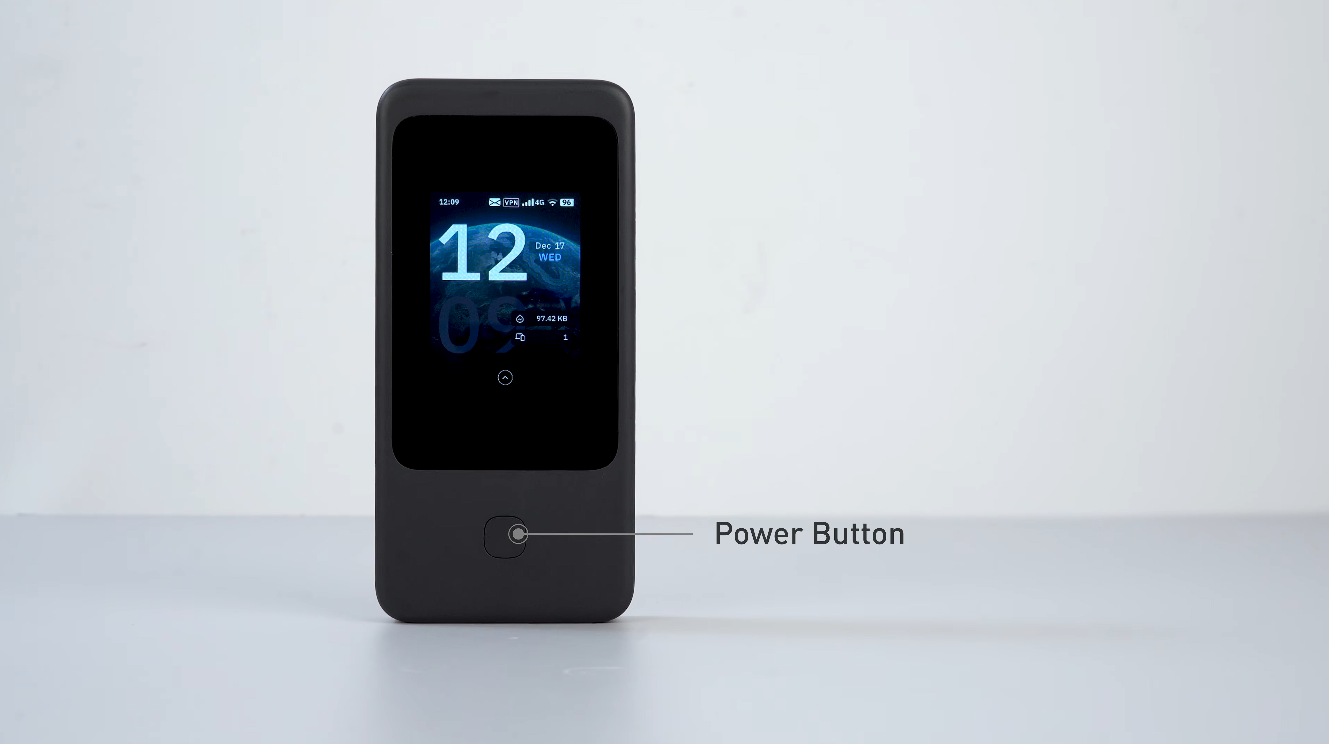
2. Einschalten
Halten Sie die Ein-/Aus-Taste 3 Sekunden lang gedrückt oder schließen Sie ein Netzteil an.
3. Grundeinstellungen
Folgen Sie den Anweisungen auf dem Bildschirm, um die Grundeinstellungen zu konfigurieren, darunter Bildschirm-Passcode, Admin-Passwort, Wi-Fi-Name, Wi-Fi-Passwort und Frequenzbänder.
Tipp: Das Standard-Admin-Passwort besteht aus den letzten 9 Zeichen der S/N des Geräts, gefolgt von einem #. Sie können dieses Standard-Passwort verwenden oder ein eigenes festlegen.
4. Internet einrichten
Richten Sie Mudi 7 mit einer der unterstützten Internetverbindungsmethoden ein: Cellular, Ethernet, Repeater, Tethering und USB Ethernet. Wenn Sie die Funktion Multi-WAN verwenden möchten, richten Sie bitte mehr als eine Internetverbindung ein.
Mudi 7 verfügt über eine integrierte eSIM und zwei Nano-SIM-Steckplätze. Sie können eine Internetverbindung herstellen, indem Sie ein eSIM-Paket kaufen (ohne physische SIM-Karte) oder Ihre Nano-SIM-Karten einsetzen, um das 5G-Mobilfunknetz zu nutzen.
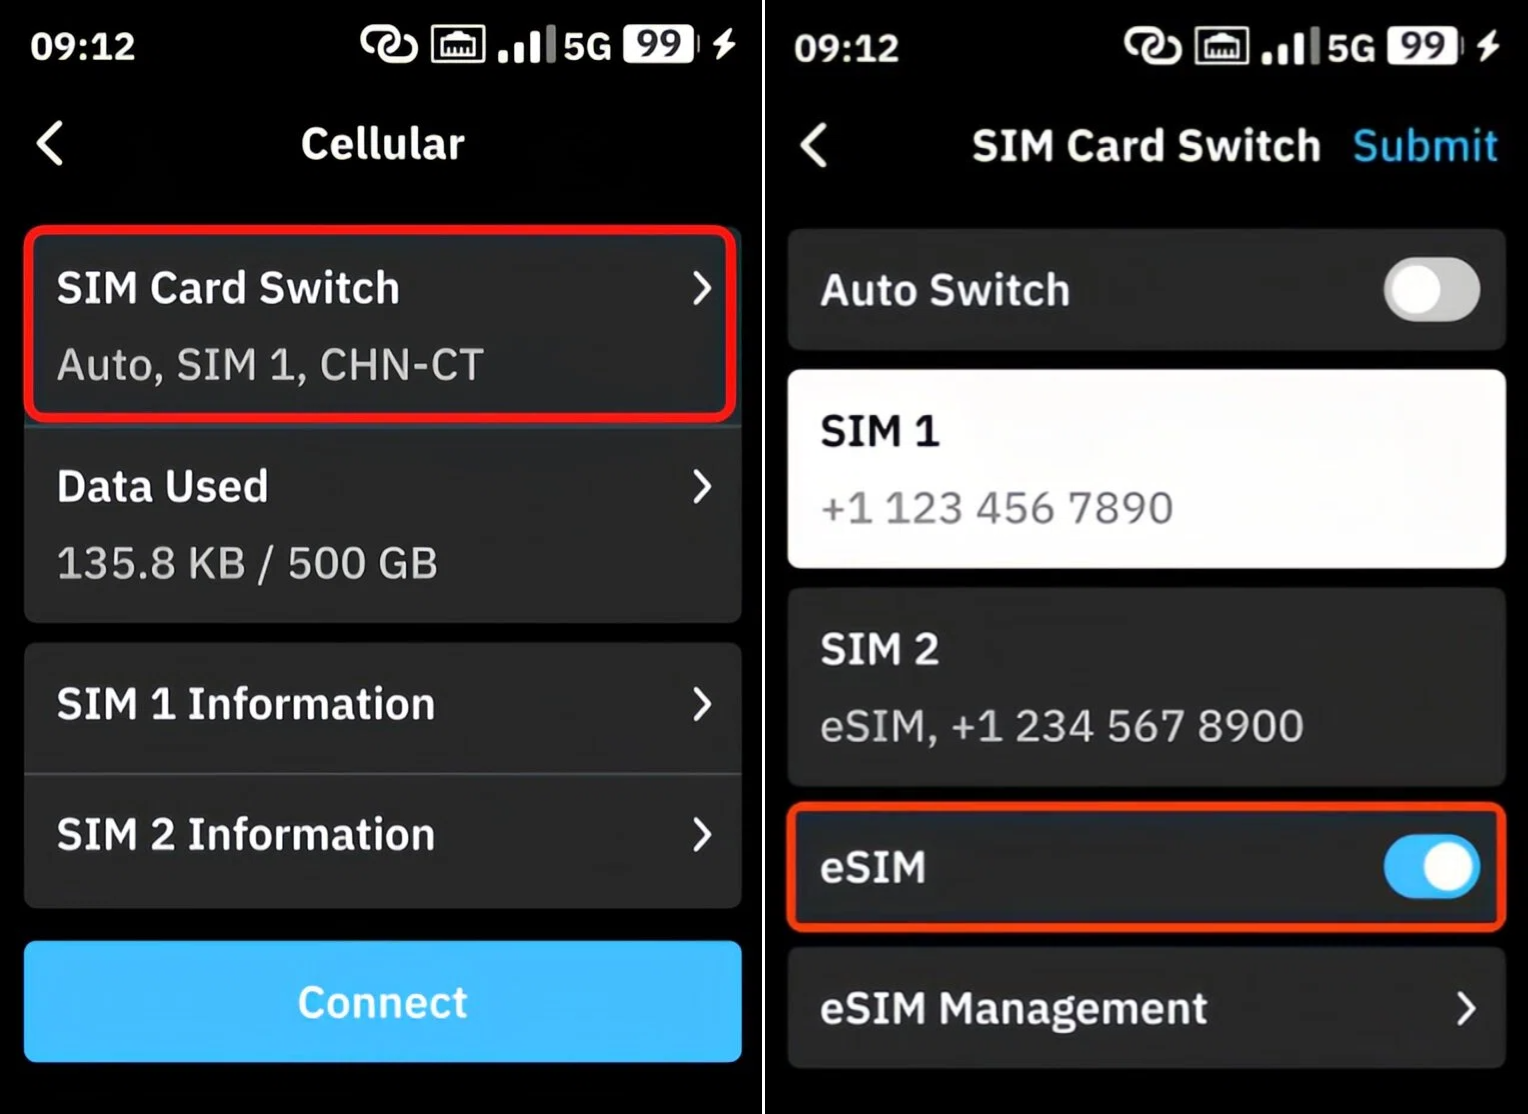
eSIM einrichten:
-
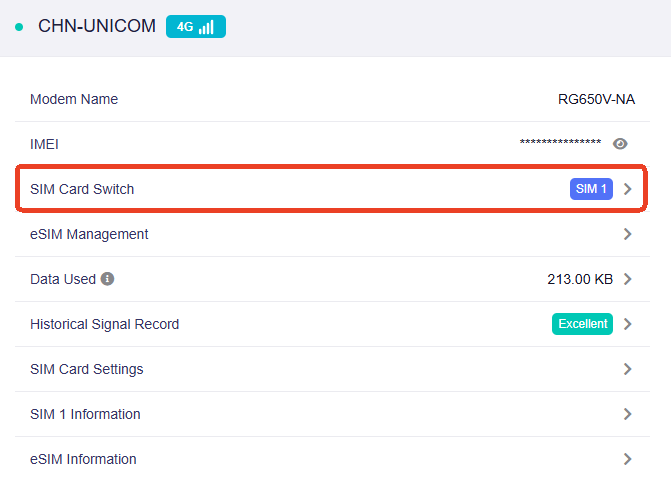
Gehen Sie auf dem Touchscreen zu Cellular -> SIM Card Switch und aktivieren Sie den Schalter, um die eSIM zu aktivieren.
-
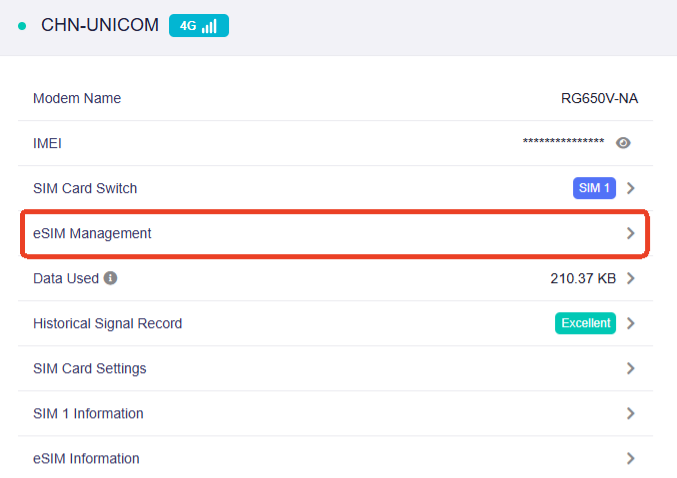
Melden Sie sich im Web-Admin-Panel an und gehen Sie zu INTERNET -> Cellular -> eSIM Management.
-
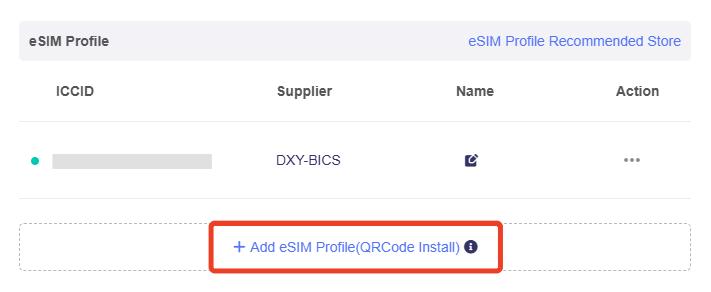
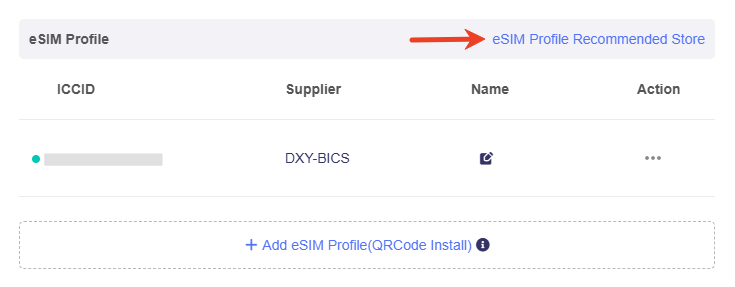
Klicken Sie im Pop-up-Fenster unten auf Add eSIM Profile.
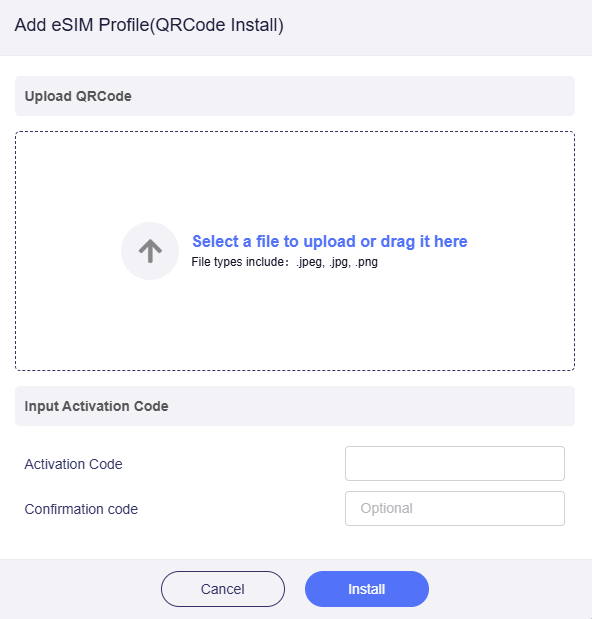
Laden Sie Ihr eSIM-Profil per QR-Code oder Aktivierungscode hoch und klicken Sie auf Install. Beachten Sie, dass die meisten eSIM-Profile nur einmal heruntergeladen und hinzugefügt werden können.
Tipp: Wenn Sie noch kein eSIM-Profil gekauft haben, können Sie eines im eSIM Profile Recommended Store erwerben.
-
Wechseln Sie nach dem Hochladen zu Cellular und klicken Sie auf SIM Card Switch.
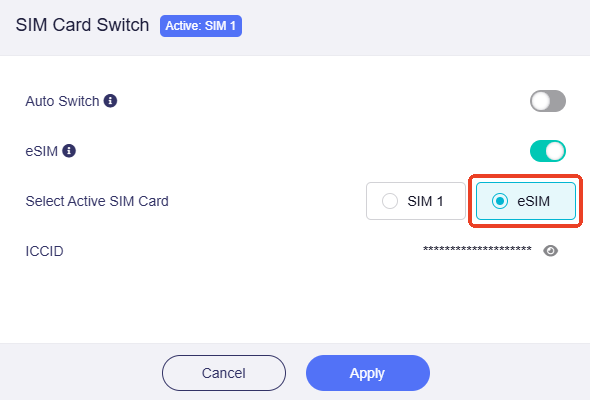
Wählen Sie im Pop-up-Fenster eSIM als aktive SIM-Karte aus und klicken Sie dann auf Apply.
-
Der Router beginnt, sich über dieses eSIM-Profil zu verbinden. Bitte warten Sie und prüfen Sie, ob die Verbindung erfolgreich hergestellt wird.
Nano-SIM einrichten:
-
Entfernen Sie die Rückabdeckung, nehmen Sie den Akku heraus, setzen Sie Ihre Nano-SIM-Karte in den Steckplatz ein und installieren Sie anschließend den Akku wieder.
-
Der Router beginnt automatisch, sich über diese Nano-SIM-Karte zu verbinden. Bitte warten Sie und prüfen Sie, ob die Verbindung erfolgreich hergestellt wird.
Sobald die Internetverbindung erfolgreich hergestellt wurde, werden die Signalbalken und der Mobilfunkstatus oben rechts auf dem Touchscreen angezeigt. Sie können die Verbindungsdetails auch im Web-Admin-Panel prüfen.
Weitere Informationen finden Sie unter Connect to the Internet via cellular.
Note
- Die integrierte eSIM und SIM 2 schließen sich gegenseitig aus und können nicht gleichzeitig aktiviert werden. Die eSIM ist standardmäßig deaktiviert. Wenn Sie die eSIM aktivieren, funktioniert SIM 2 nicht, selbst wenn eine SIM-Karte eingesetzt ist.
- Da Mudi 7 über eine integrierte eSIM verfügt, wird eine SIMPoYo eSIM-Physikkarte auf dem Mudi 7 als normale SIM-Karte ohne eSIM-Funktion erkannt.
- Verbinden Sie den Ethernet-Port Ihres Mudi 7 per Ethernet-Kabel mit einer vorgelagerten Netzwerkquelle, z. B. einem ISP-Modem, Netzwerkswitch oder einer Ethernet-Wanddose.
-
Gehen Sie auf dem Touchscreen oder im Web-Admin-Panel zu Network -> Ethernet Ports, setzen Sie die Portrolle auf WAN und klicken Sie auf Apply.
-
Sobald die Internetverbindung erfolgreich hergestellt wurde, erscheint oben rechts auf dem Touchscreen ein Ethernet-Port-Symbol. Die Verbindungsdetails können Sie auch im Web-Admin-Panel prüfen.
Detaillierte Anweisungen finden Sie unter Über ein Ethernet-Kabel eine Verbindung zum Internet herstellen.
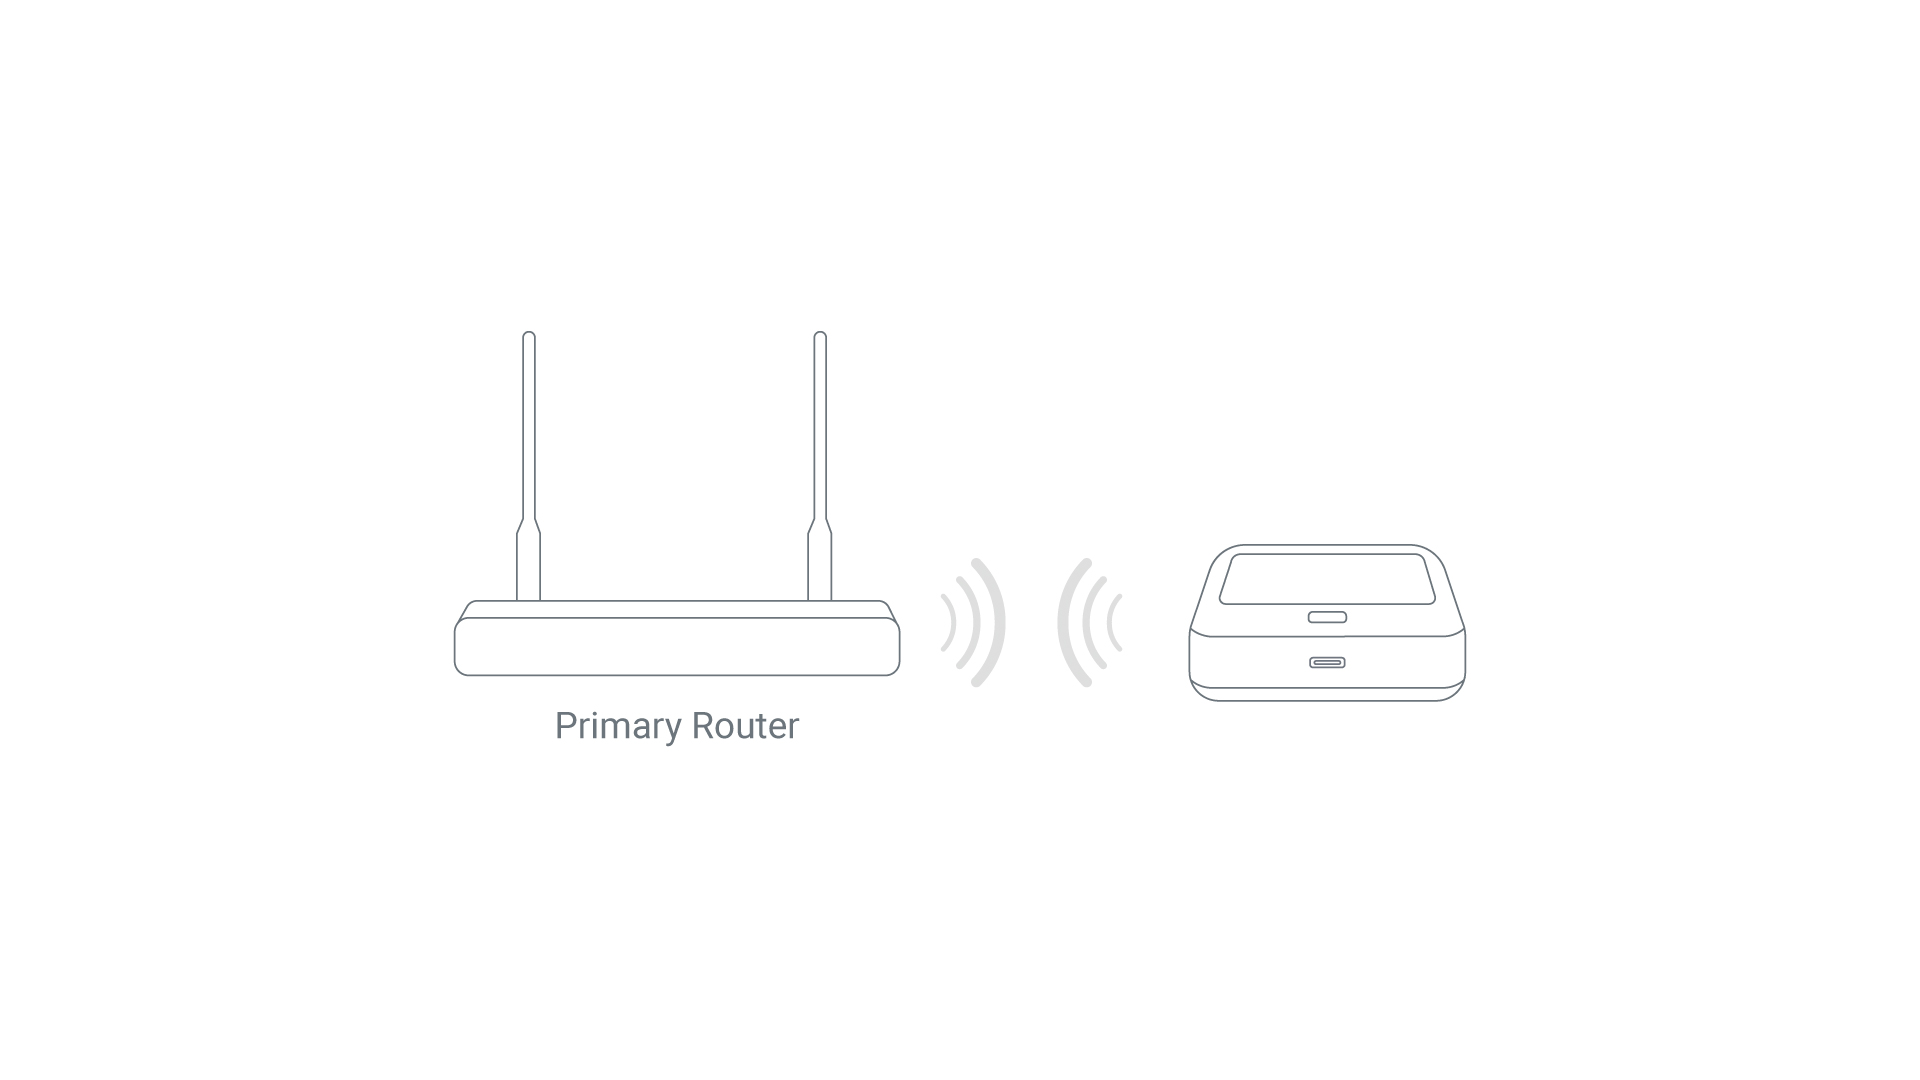
- Gehen Sie auf dem Touchscreen oder im Web-Admin-Panel zu Internet -> Repeater und klicken Sie auf Connect. Mudi 7 beginnt dann mit der Suche nach verfügbaren Wi-Fi-Netzwerken.
- Wählen Sie das Wi-Fi-Netzwerk aus, das Mudi 7 erweitern soll.
- Geben Sie das Passwort ein und klicken Sie auf Apply.
- Sobald die Internetverbindung erfolgreich hergestellt wurde, erscheint oben rechts auf dem Touchscreen ein Wi-Fi-Symbol. Die Verbindungsdetails können Sie auch im Web-Admin-Panel prüfen.
Detaillierte Anweisungen finden Sie unter Über ein vorhandenes Wi-Fi-Netzwerk eine Verbindung zum Internet herstellen.
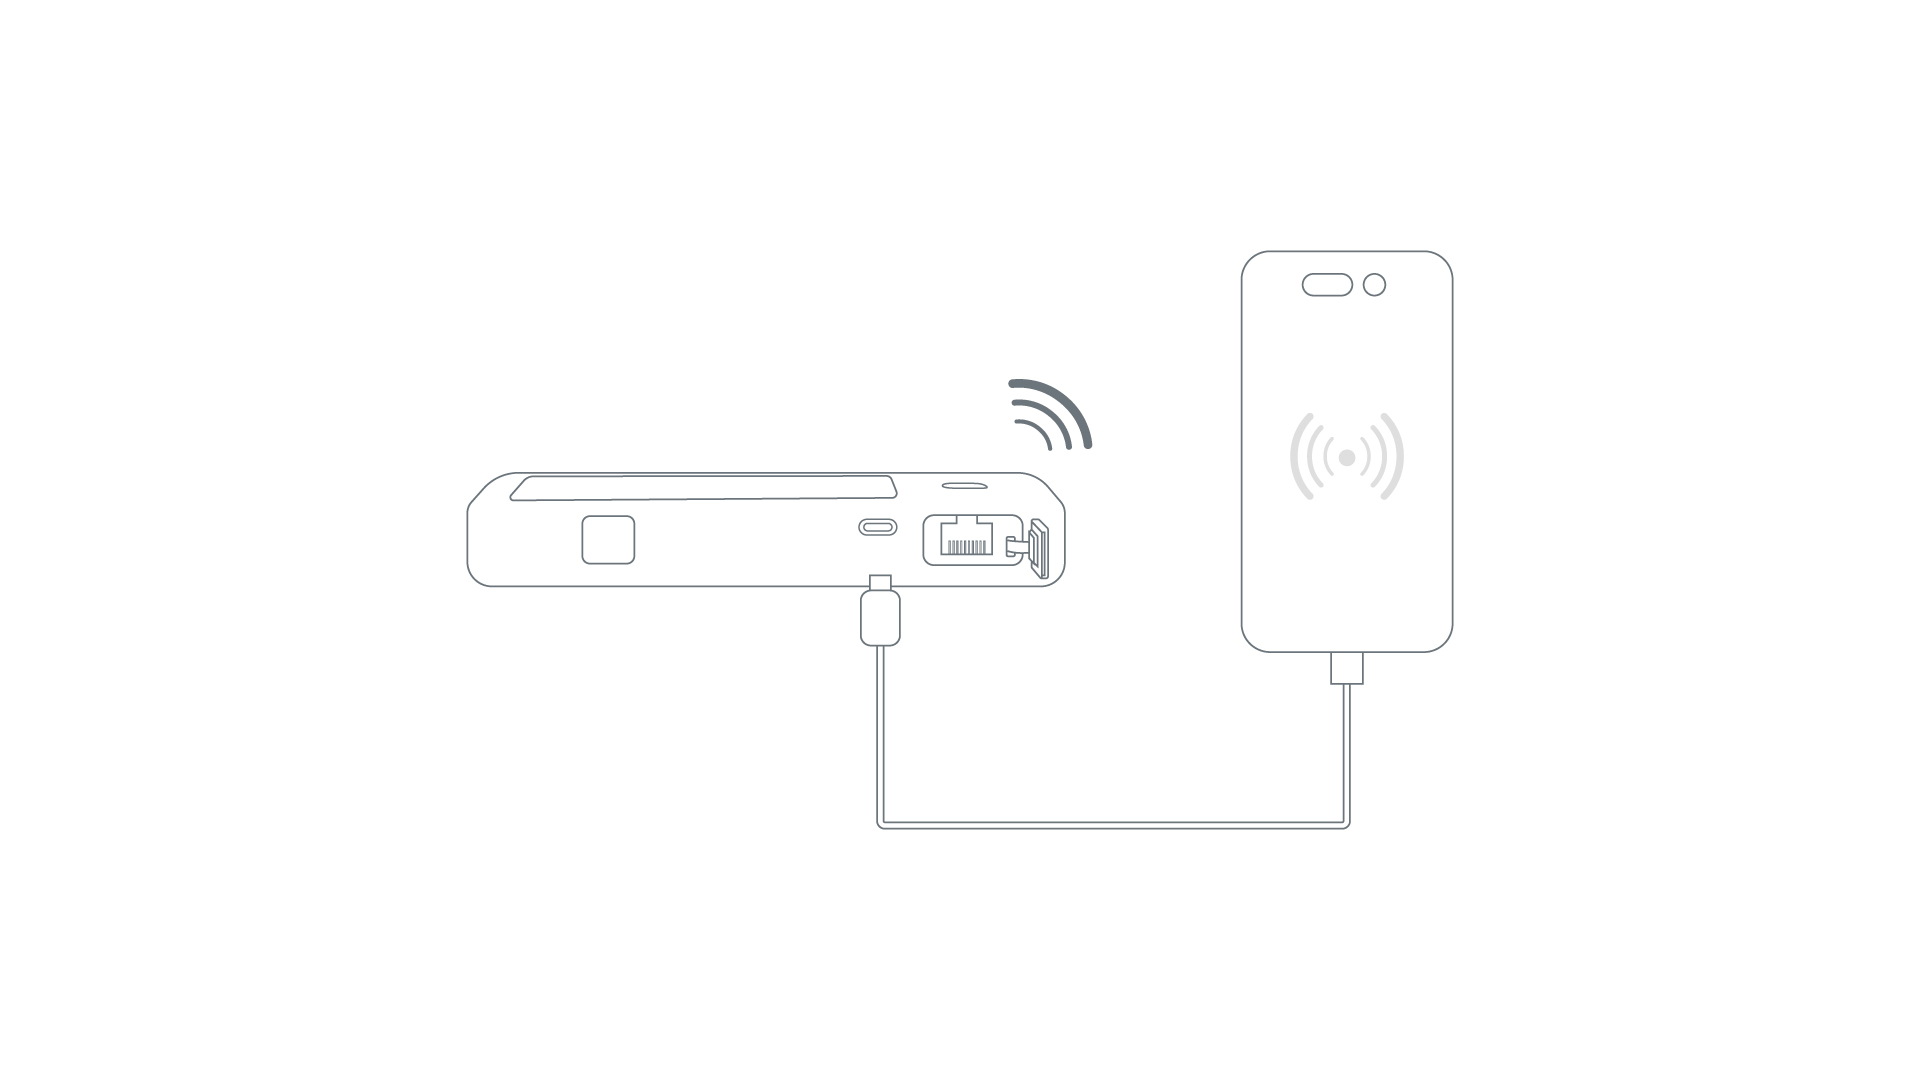
- Verbinden Sie Ihr Mobilgerät, z. B. ein Smartphone oder USB-Dongle, per USB-Kabel mit dem USB-C-Port des Mudi 7.
- Öffnen Sie auf Ihrem Mobilgerät die Einstellungen und aktivieren Sie USB Tethering. Wenn Sie ein iPhone verwenden, tippen Sie bei entsprechender Aufforderung auf Trust This Device.
- Mudi 7 verbindet sich anschließend automatisch mit Ihrem Gerät. Falls keine Verbindung hergestellt wird, wiederholen Sie die obigen Schritte oder melden Sie sich im Web-Admin-Panel an und prüfen Sie die Tethering-Verbindung auf der Seite INTERNET.
- Sobald die Internetverbindung erfolgreich hergestellt wurde, erscheint oben rechts auf dem Touchscreen ein Kettensymbol. Die Verbindungsdetails können Sie auch im Web-Admin-Panel prüfen.
Detaillierte Anweisungen finden Sie unter Über USB-Tethering eine Verbindung zum Internet herstellen.
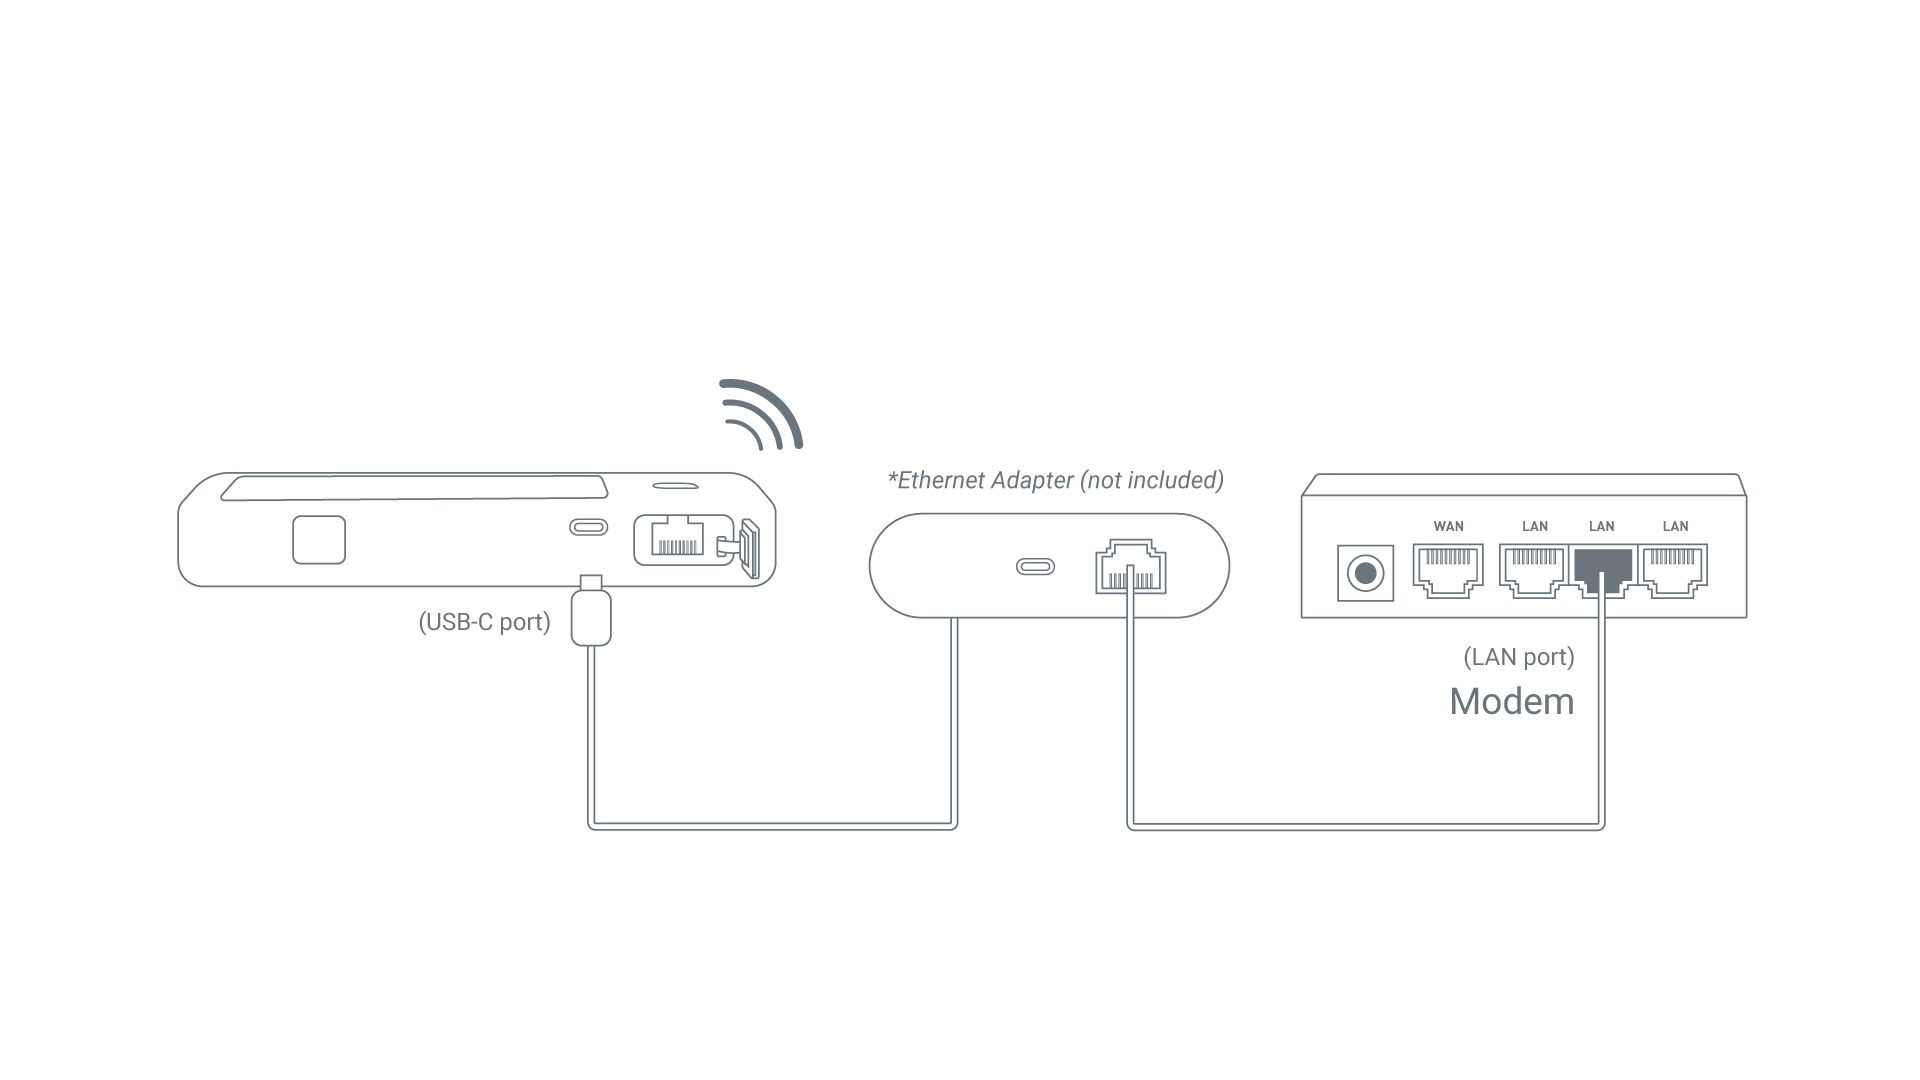
Mudi 7 ist mit einem OTG-fähigen USB-C-Port ausgestattet, sodass Sie für Dual-Ethernet-WAN einen zweiten Ethernet-Port hinzufügen können. Dafür wird ein separat erhältlicher USB-C-auf-Ethernet-Adapter benötigt.
*USB OTG (On-The-Go) ist ein USB-Standard, der kompatiblen Geräten wie Routern erlaubt, zwischen Host- und Peripherierolle zu wechseln, sodass direkte Datenübertragung und Stromversorgung ohne separates Host-Gerät möglich sind.
- Verbinden Sie eine vorgelagerte Netzwerkquelle, z. B. ein ISP-Modem, einen Netzwerkswitch oder eine Ethernet-Wanddose, über einen USB-C-auf-Ethernet-Adapter mit dem USB-C-Port des Mudi 7.
-
Gehen Sie auf dem Touchscreen oder im Web-Admin-Panel zu Network -> Ethernet Ports -> USB Ethernet Port, setzen Sie die Portrolle auf WAN und klicken Sie auf Apply.
-
Mudi 7 verbindet sich anschließend automatisch mit Ihrem Gerät. Falls keine Verbindung hergestellt wird, wiederholen Sie die obigen Schritte oder melden Sie sich im Web-Admin-Panel an und prüfen Sie die USB-Ethernet-Verbindung auf der Seite INTERNET.
- Sobald die Internetverbindung erfolgreich hergestellt wurde, erscheinen oben rechts auf dem Touchscreen ein USB-Symbol und ein Ethernet-Port-Symbol. Die Verbindungsdetails können Sie auch im Web-Admin-Panel prüfen.
Firmware-Upgrade
Vor dem Upgrade bitte beachten:
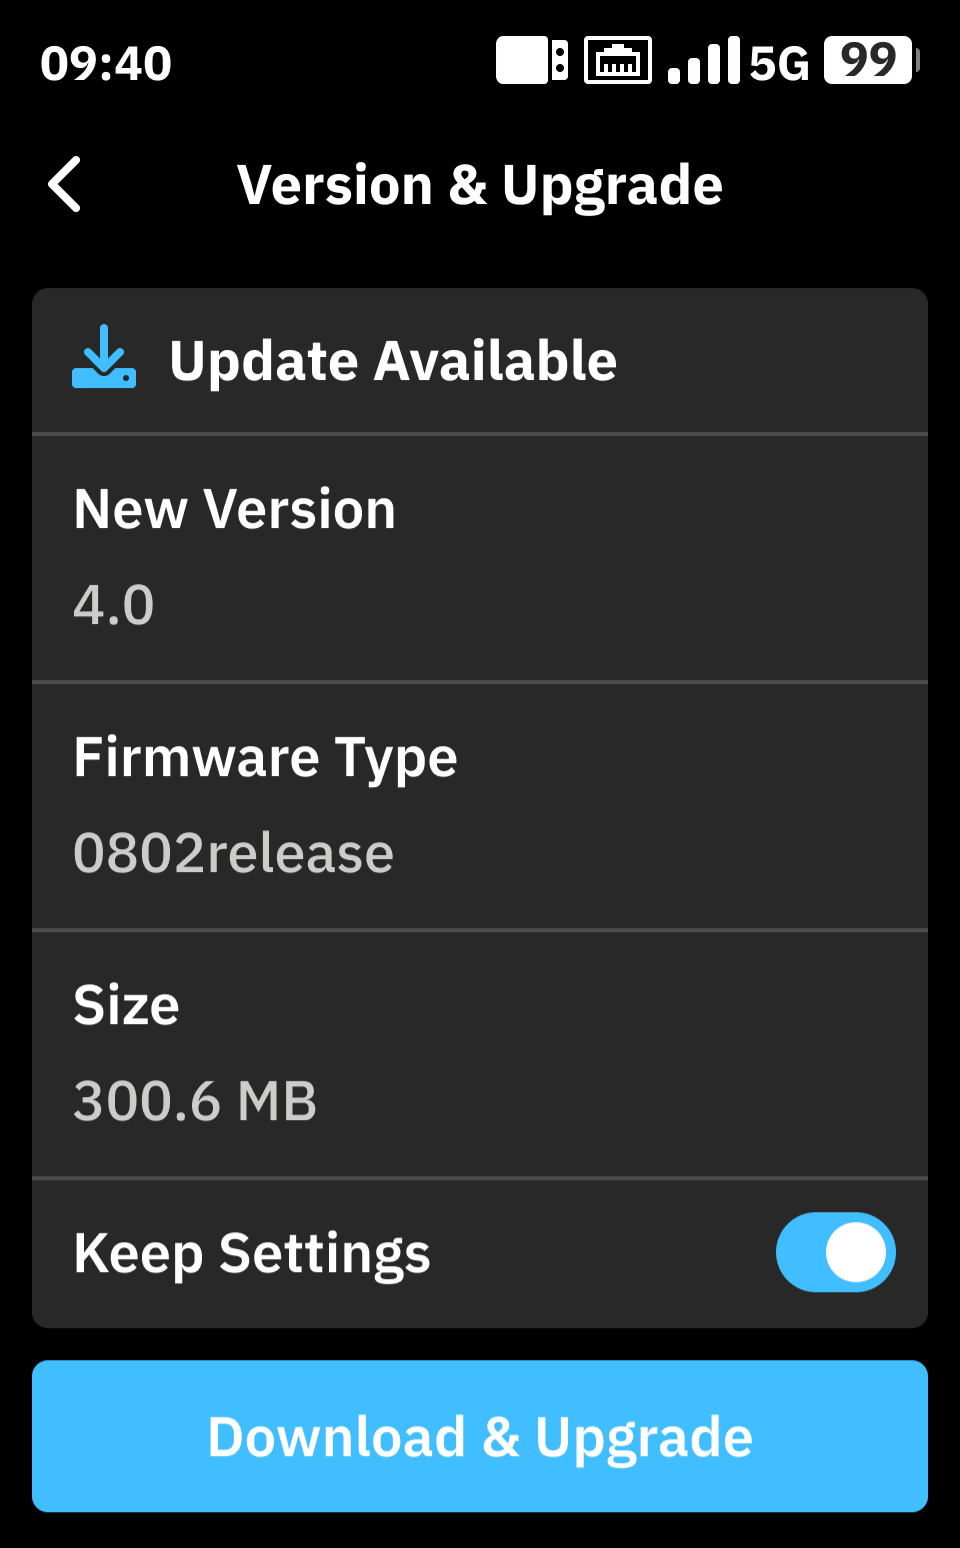
- Um Ihre Mudi-7-Konfigurationen zu behalten, wählen Sie auf der Upgrade-Seite Keep Settings.
- Wählen Sie Keep Settings nicht beim Downgrade, da es zu Kompatibilitätsproblemen kommen kann.
- Für ein Firmware-Upgrade wird eine gewisse Datenmenge verbraucht. Wenn Ihr SIM-Kartentarif ein begrenztes Datenvolumen hat, empfehlen wir, den Router über andere Methoden mit dem Internet zu verbinden (z. B. Repeater, USB Tethering usw.), um zusätzlichen Datenverbrauch zu vermeiden.
Sie können die Firmware von Mudi 7 über den Touchscreen oder das Web-Admin-Panel aktualisieren.
Upgrade über den Touchscreen
-
Verbinden Sie Ihren Mudi 7 mit dem Internet.
-
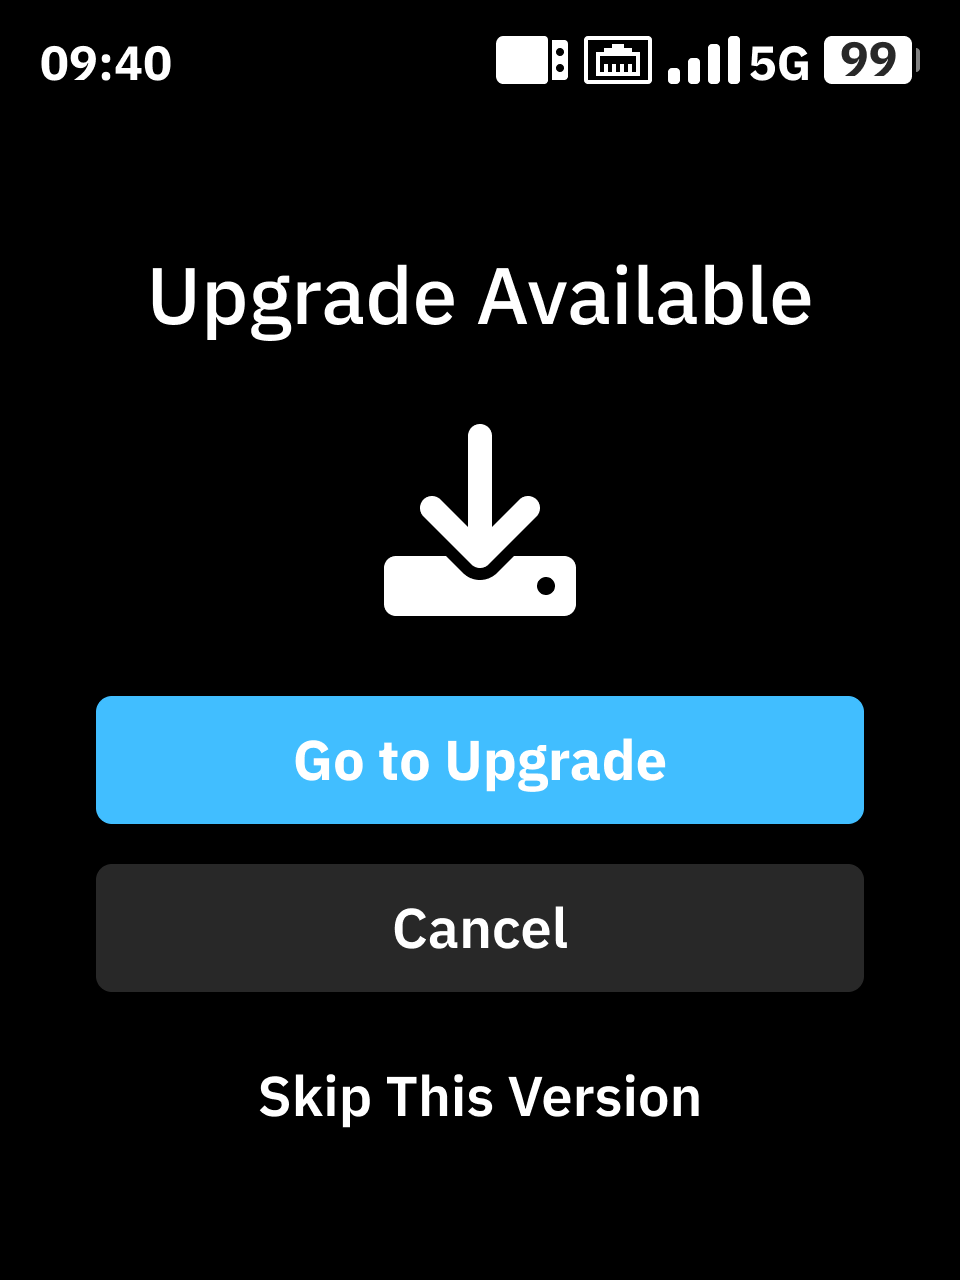
Sobald die Verbindung hergestellt ist, sucht das System automatisch nach verfügbaren Firmware-Updates. Wenn eine neue Firmware verfügbar ist, erscheint eine Meldung auf dem Bildschirm. Klicken Sie im Pop-up-Fenster auf Go to Upgrade, um fortzufahren.
- Wenn das Pop-up-Fenster nicht erscheint, tippen Sie auf dem Startbildschirm auf More -> About Device -> Version & Upgrade -> Download & Upgrade und folgen Sie dann den Anweisungen auf dem Bildschirm, um die Firmware zu aktualisieren.
Upgrade über das Web
- Online-Upgrade
Melden Sie sich im Web-Admin-Panel an und gehen Sie zu SYSTEM -> Upgrade -> Firmware Online Upgrade, um die Firmware Ihres Routers zu aktualisieren.
Weitere Informationen finden Sie hier.
- Lokales Upgrade
Melden Sie sich im Web-Admin-Panel an und gehen Sie zu SYSTEM -> Upgrade -> Firmware Local Upgrade, um die Firmware Ihres Routers zu aktualisieren.
Weitere Informationen finden Sie hier.
Werkseinstellungen wiederherstellen
Es gibt drei Möglichkeiten, Ihren Mudi 7 zurückzusetzen: direkt über den Touchscreen, mit der Reset-Taste und über das Web-Admin-Panel.
Hinweis: Bevor Sie den Reset durchführen, stellen Sie sicher, dass Mudi 7 vollständig hochgefahren ist. Drücken Sie die Reset-Taste NICHT direkt nach dem Einschalten, da sonst der U-Boot-Failsafe-Modus ausgelöst werden kann.
Sehen Sie sich dieses Video an oder folgen Sie den untenstehenden Schritten.
Über den Touchscreen zurücksetzen
- Tippen Sie auf der Startseite auf More.
- Scrollen Sie auf der Seite More ganz nach unten und tippen Sie auf Reset.
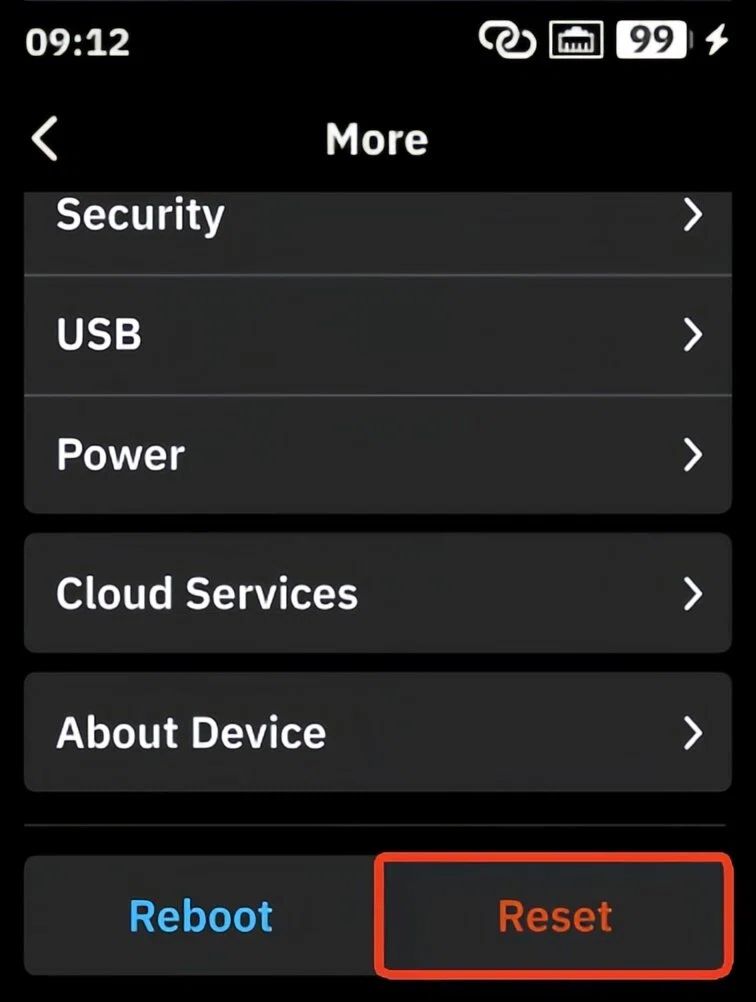
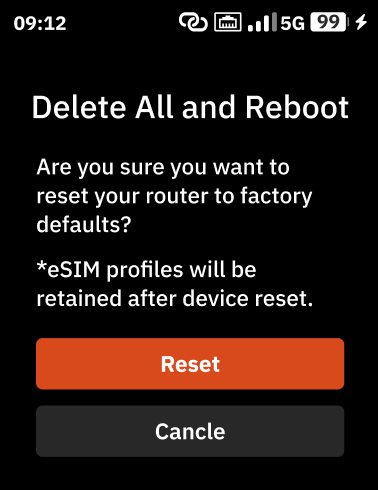
- Tippen Sie zur Bestätigung erneut auf Reset. Der Router beginnt mit dem Zurücksetzen und startet anschließend neu.
Über die Taste zurücksetzen
- Entfernen Sie die Rückabdeckung. Dort finden Sie die Reset-Taste wie unten gezeigt.
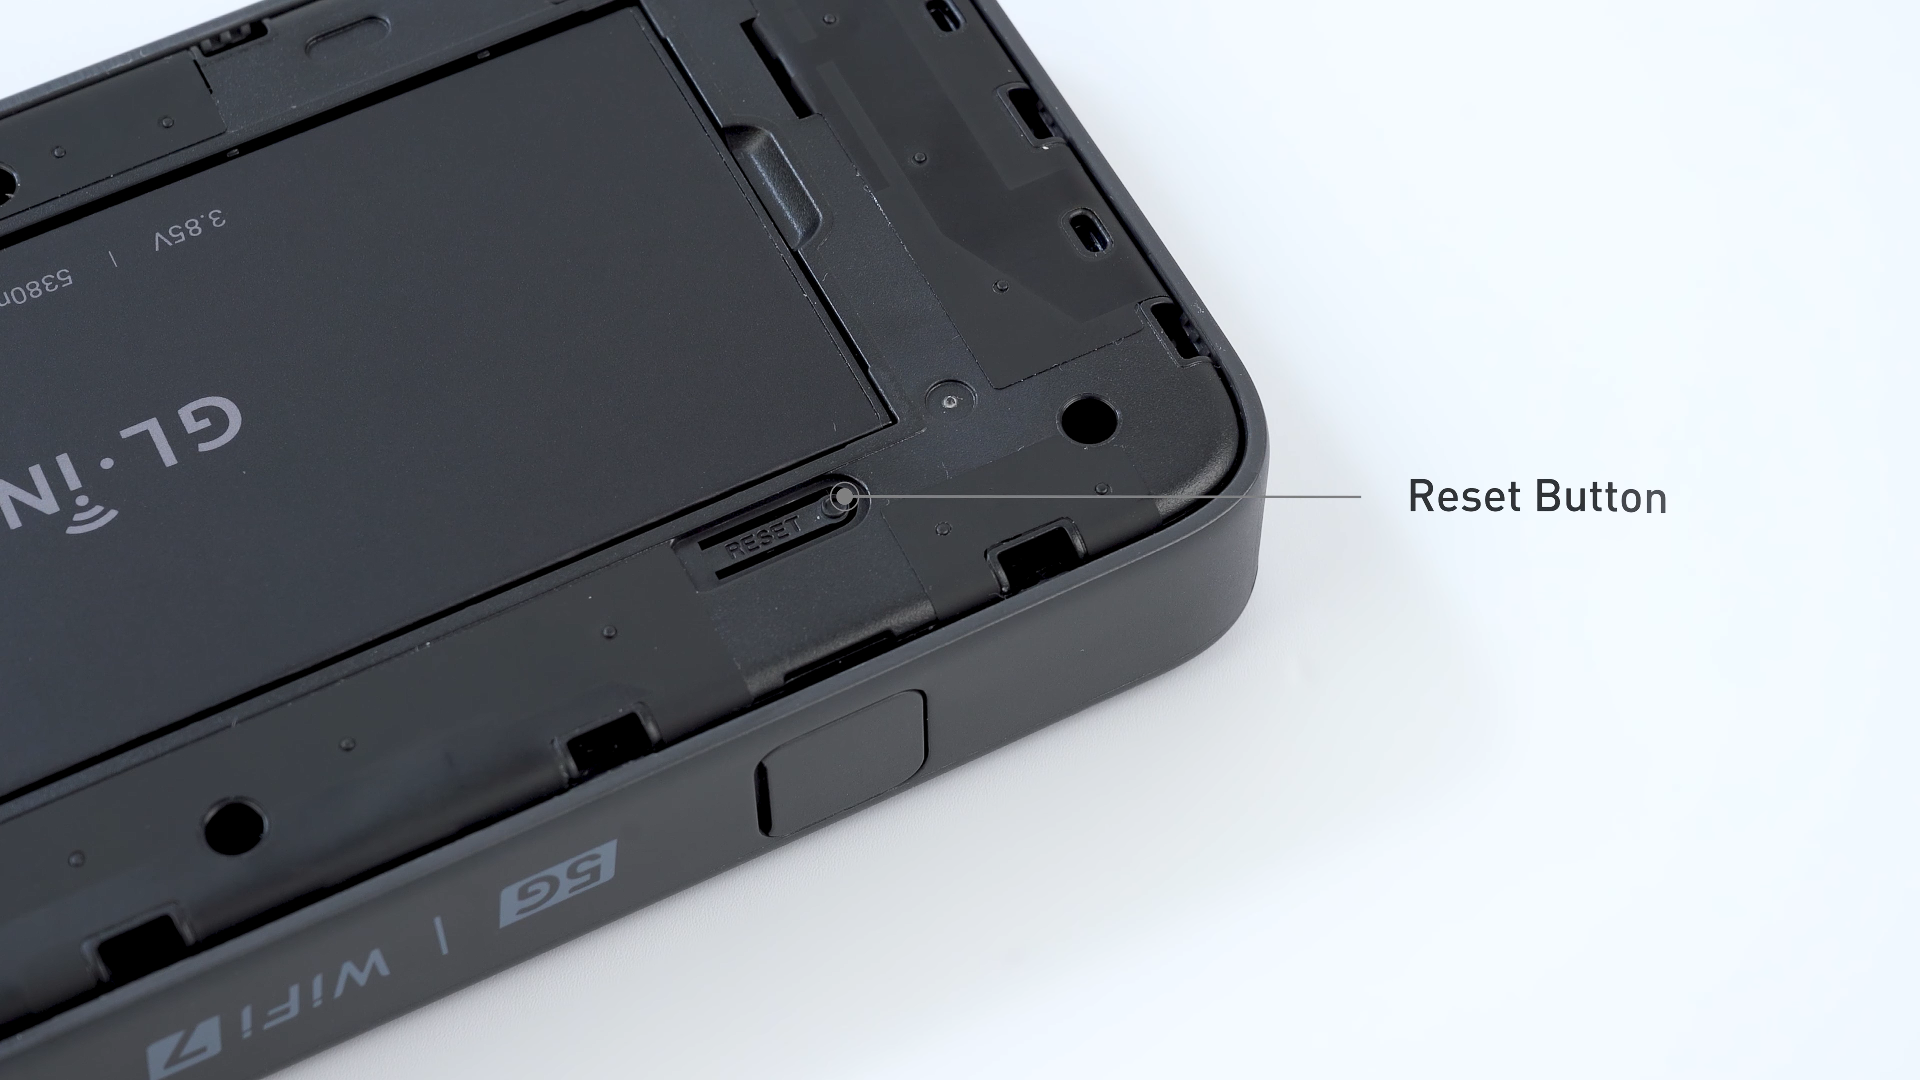
- Halten Sie die Reset-Taste 10 Sekunden lang gedrückt und lassen Sie sie dann los, um einen Hard Reset durchzuführen. Achten Sie währenddessen auf die Hinweise auf dem Bildschirm und folgen Sie den Anweisungen.
Dadurch werden alle Ihre Einstellungen gelöscht. Bitte gehen Sie vorsichtig vor.
Tipp: Wenn Sie die Netzwerkverbindung wiederherstellen möchten, ohne einen Werksreset durchzuführen, halten Sie die Reset-Taste einfach 4 Sekunden lang gedrückt und lassen Sie sie dann los, um Ihr Netzwerk zu reparieren. Achten Sie währenddessen auf die Hinweise auf dem Bildschirm und folgen Sie den Anweisungen.
Dadurch wird die Netzwerkschnittstelle neu gestartet, während Wi-Fi-Einstellungen, VPN-Konfigurationen (deaktiviert), Systemeinstellungen usw. erhalten bleiben.
Soft Reset
-
Ein Soft Reset startet das Gerät neu, ohne Daten zu löschen, während ein Werksreset die Standardeinstellungen wiederherstellt und alle Benutzerdaten löscht.
-
Wenn Wi-Fi deaktiviert wurde, stellt ein Soft Reset Wi-Fi wieder auf den standardmäßig aktivierten Zustand zurück.
-
Ein Soft Reset kann auch verwendet werden, um das Gerät schnell vom Nicht-Router-Modus in den Router-Modus zu wechseln.
Über das Web zurücksetzen
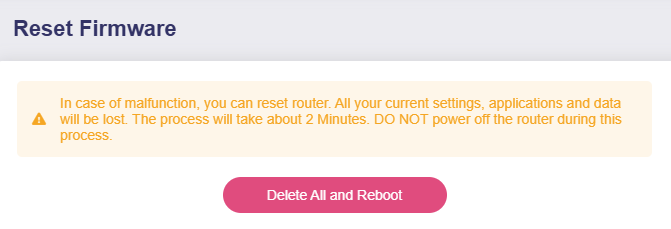
-
Melden Sie sich im Web-Admin-Panel an und gehen Sie zu SYSTEM -> Reset Firmware.
-
Klicken Sie auf Delete All and Reboot. Der Router beginnt mit dem Zurücksetzen und startet anschließend neu.
Anmeldung im Web-Admin-Panel
Sie können sich im Web-Admin-Panel des Mudi 7 anmelden, um weitere Einstellungen zu konfigurieren oder zu prüfen.
Verbinden Sie zunächst ein Gerät, z. B. einen Computer, Laptop oder ein Smartphone, per Wi-Fi, Ethernet-Kabel oder USB-Kabel mit dem Mudi 7.
- Wi-Fi
- QR-Code: Scannen Sie mit Ihrem Gerät den QR-Code auf dem Bildschirm des Mudi 7. Klicken Sie anschließend auf Ihrem Gerät auf „Join“, um die Verbindung herzustellen.
-
Manuell verbinden: Öffnen Sie auf Ihrem Gerät Einstellungen -> WLAN, suchen Sie den Wi-Fi-Netzwerknamen des Mudi 7 in der Liste der verfügbaren Netzwerke und geben Sie das Passwort ein, um sich zu verbinden. Den Standard-Netzwerknamen und das Standard-Passwort finden Sie auf dem Etikett.
-
Ethernet
Verbinden Sie Ihr Gerät per Ethernet-Kabel mit dem Ethernet-Port des Mudi 7 (standardmäßig LAN).
- USB
Verbinden Sie Ihr Gerät per USB-Kabel mit dem USB-C-Port des Mudi 7. Über den OTG-fähigen USB-C-Port können Sie im nächsten Schritt auf die WebGUI des Mudi 7 zugreifen.
Öffnen Sie dann einen Webbrowser und geben Sie 192.168.8.1 in die Adressleiste ein, um die Anmeldeseite aufzurufen. Wählen Sie Ihre Sprache aus, legen Sie Ihr Admin-Passwort fest und klicken Sie auf Apply.
Anschließend sind Sie im Web-Admin-Panel des Mudi 7 angemeldet.
Im Folgenden finden Sie einen Überblick über die Funktionen im Web-Admin-Panel des Mudi 7.
WLAN
Auf der Seite Wireless können Sie Einstellungen für die 6-GHz-, 5-GHz- und 2.4-GHz-Wi-Fi-Netzwerke konfigurieren, darunter das Aktivieren von Wi-Fi, das Festlegen der TX-Leistung, das Definieren des Wi-Fi-Namens (SSID), das Aktivieren randomisierter BSSID, die Auswahl des Wi-Fi-Sicherheitsmodus und Passworts sowie die Konfiguration von SSID-Sichtbarkeit, Wi-Fi-Modus, Bandbreite und Kanal.
Informationen zur Einrichtung von Wireless finden Sie unter Wireless.
Hinweis: Bei den Wireless-Einstellungen des Mudi 7 gibt es einige Unterschiede im Vergleich zu anderen GL.iNet-Wi-Fi-7-Routern.
- Aufgrund von Hardware-Beschränkungen des Chipsatzes können 5-GHz- und 6-GHz-Wi-Fi nicht gleichzeitig aktiviert werden.
- Wenn Repeater aktiviert ist, wird das Gastnetzwerk automatisch deaktiviert.
- Wie gesetzlich vorgeschrieben, sollten Sie Wi-Fi bei Verwendung im Außenbereich auf den Outdoor-Modus umstellen. Dadurch kann sich die Reichweite verringern. Die Nutzungsumgebung (Indoor oder Outdoor) können Sie oben auf der Seite Wireless umschalten.
Clients
Auf der Seite Clients werden Informationen zu verbundenen Geräten angezeigt. Für jeden Client werden Name, IP- und MAC-Adressen, Download- und Upload-Geschwindigkeiten sowie das gesamte Datenvolumen angezeigt. Außerdem können Sie den Client blockieren oder weitere Aktionen ausführen.
Informationen zur Einrichtung von Clients finden Sie unter Clients.
Cloud-Dienste
Der Cloud-Management-Dienst GL.iNet GoodCloud bietet eine einfache Möglichkeit, per Fernzugriff auf GL.iNet-Router zuzugreifen und sie zu verwalten.
Zum Einrichten von GoodCloud lesen Sie bitte GoodCloud.
AstroWarp ist eine fortschrittliche Netzwerkplattform für nahtlose Remote-Vernetzung und Fernverwaltung von Geräten. AstroWarp wurde speziell für die Integration mit GL.iNet-Routern entwickelt und unterstützt ein umfassendes Gerätemanagement über ganze Netzwerke hinweg, einschließlich der Verwaltung über- und untergeordneter Geräte. Mit seinem Fokus auf netzwerkweites Management und zukünftiger Unterstützung für Hardware-Steuerung bietet AstroWarp eine robuste und verlässliche Lösung für die Geräteverwaltung sowie für sichere und stabile Netzwerke.
Zum Einrichten von AstroWarp lesen Sie bitte AstroWarp.
VPN
Ein VPN (virtuelles privates Netzwerk) erstellt einen sicheren, verschlüsselten Datenverkehr zwischen Ihrem Gerät und dem VPN-Server. Es bietet eine zusätzliche Ebene für Datenschutz und Sicherheit (VPN-Client) und ermöglicht Ihnen den Zugriff auf ein entferntes Netzwerk (VPN-Server). Mudi 7 unterstützt OpenVPN und WireGuard.
Mudi 7 und andere GL.iNet-Router unterstützen das OpenVPN-Protokoll, das hohe Sicherheit bietet. Folgen Sie zum Einrichten von OpenVPN diesen Anleitungen:
Mudi 7 und andere GL.iNet-Router unterstützen das WireGuard-Protokoll, das hohe Geschwindigkeiten und eine komfortable Nutzung bietet. Folgen Sie zum Einrichten von WireGuard diesen Anleitungen:
Netzwerk
Multi-WAN ist eine Netzwerkfunktion, mit der Sie Ihren Router gleichzeitig mit mehreren Internetverbindungen einrichten können, z. B. Ethernet, Repeater, Tethering, Cellular und USB Ethernet. Wenn Ihre aktuelle Internetverbindung ausfällt, wechselt der Router automatisch zu einer anderen Internetverbindung. So bleibt der Internetzugang stabil und unterbrechungsfrei.
Zum Einrichten von Multi-WAN lesen Sie bitte Multi-WAN.
LAN, kurz für Local Area Network, ist ein Netzwerk, das Computer und Geräte in einem begrenzten geografischen Bereich wie einem Zuhause oder Büro verbindet. Es ermöglicht schnelle Datenübertragung und gemeinsame Ressourcennutzung, sodass Geräte effizient miteinander kommunizieren können.
Zum Einrichten von LAN lesen Sie bitte Lan.
Hier können Sie ein Subnetz innerhalb der privaten IPv4-Adressbereiche 192.168.0.0/16, 172.16.0.0/12 oder 10.0.0.0/8 festlegen, Gateway- und Netmasken-IP-Adressen angeben und Sicherheitseinstellungen wie AP Isolation für das Gastnetzwerk konfigurieren.
Zum Einrichten des Gastnetzwerks lesen Sie bitte Guest Network.
Auf der Seite DNS können Sie benutzerdefinierte DNS-Server festlegen, den Schutz vor DNS-Rebinding-Angriffen aktivieren und die DNS-Einstellungen aller Clients überschreiben. Außerdem können Sie erlauben, dass benutzerdefiniertes DNS VPN-DNS überschreibt, und den DNS-Servermodus auf automatisch setzen oder DNS-Server der Ethernet-Verbindung manuell angeben.
Zum Einrichten von DNS lesen Sie bitte DNS.
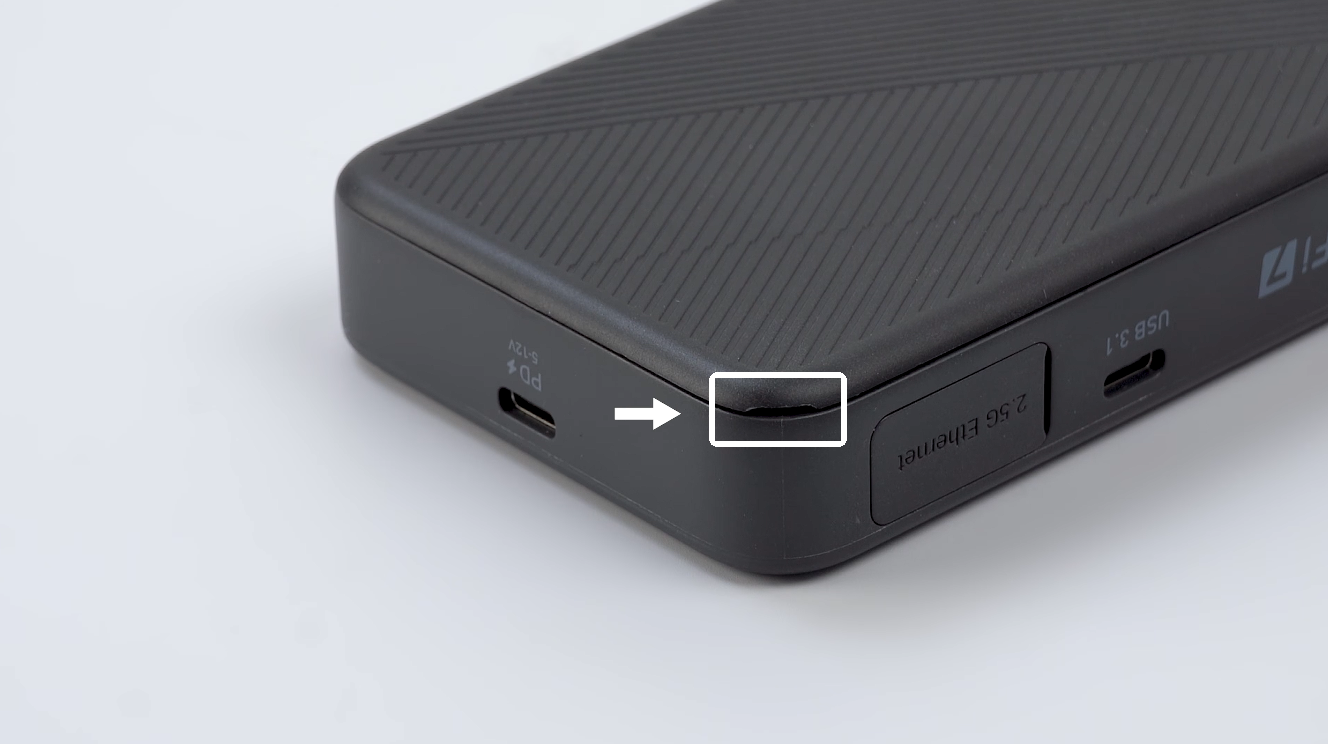
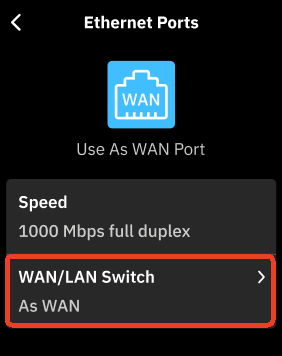
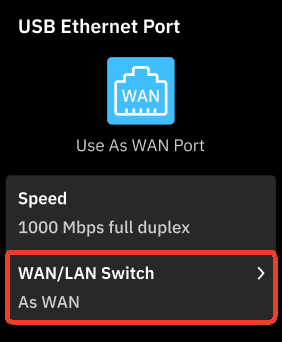
Auf der Seite Ethernet Port können Sie die Portrolle des Ethernet-Ports festlegen, also ihn als WAN oder LAN verwenden, den MAC-Modus und die MAC-Adresse für die WAN-Schnittstelle ändern und die ausgehandelte Portgeschwindigkeit anzeigen.
Mudi 7 verfügt über einen einzelnen Ethernet-Port, der standardmäßig als LAN konfiguriert ist. Bei Bedarf können Sie ihn über den Touchscreen oder das Web-Admin-Panel auf WAN umstellen.
Zum Verwalten der Ethernet-Ports lesen Sie bitte Ethernet Port.
IPv6, kurz für Internet Protocol Version 6, ist die neueste Version des Internetprotokolls und wurde als Nachfolger von IPv4 entwickelt. Es bietet einen wesentlich größeren Adressraum und damit nahezu unbegrenzt viele eindeutige IP-Adressen, was für die stetig wachsende Zahl internetfähiger Geräte entscheidend ist.
Zum Einrichten von IPv6 lesen Sie bitte IPV6.
IGMP Snooping ist eine Netzwerkoptimierungstechnik, die in Ethernet-Switches eingesetzt wird, um Multicast-Datenverkehr zu verwalten und zu steuern.
Zum Einrichten von IGMP Snooping lesen Sie bitte IGMP Snooping.
Der Netzwerkmodus bezeichnet die Konfiguration, die festlegt, wie sich ein Gerät mit einem Netzwerk verbindet und mit anderen Geräten kommuniziert.
Zum Einrichten des Netzwerkmodus lesen Sie bitte Network Mode.
Hinweis: Mudi 7 unterstützt Router-, Access-Point- und Extender-Modus. Der WDS-Modus wird nicht unterstützt.
Drop-in Gateway erweitert die Funktionalität Ihres Hauptrouters um Funktionen wie AdGuard Home, verschlüsseltes DNS und VPN-Client.
Zum Einrichten von Drop-in Gateway lesen Sie bitte diese Links:
Netzwerkbeschleunigung kann die CPU-Last reduzieren und die Weiterleitung von Datenpaketen beschleunigen.
Zum Einrichten der Netzwerkbeschleunigung lesen Sie bitte Network Acceleration.
Durchflusskontrolle
Parental Control hilft Ihnen dabei, die Geräte Ihrer Kinder zu verwalten und zu steuern. Dazu gehören die Begrenzung der Bildschirmzeit und die Einschränkung des Zugriffs auf bestimmte Inhalte.
Zum Einrichten von Parental Control lesen Sie bitte Parental Control.
Sicherheit
Port forwarding ermöglicht es entfernten Servern und Geräten im Internet, auf Geräte in einem privaten Netzwerk zuzugreifen.
Zum Einrichten der Portweiterleitung lesen Sie bitte Port Forwarding.
Mit Management Control können Sie verschiedene Sicherheitseinstellungen konfigurieren, um Ihr Netzwerk und Ihren Router vor unbefugtem Zugriff zu schützen. Diese Seite enthält die folgenden Optionen:
- Local Access Control: Verwalten und beschränken Sie den Zugriff auf die Routeroberfläche von Geräten in Ihrem lokalen Netzwerk.
- Remote Access Control: Konfigurieren und beschränken Sie den Zugriff auf die Routeroberfläche aus entfernten Standorten über das Internet, um die Sicherheit vor externen Bedrohungen zu erhöhen.
- Open Ports on Router: Steuern Sie, welche Ports am Router geöffnet sind, um potenzielle Schwachstellen und unbefugten Zugriff zu begrenzen.
Diese Einstellungen helfen Ihnen, eine sichere Netzwerkumgebung aufrechtzuerhalten und sowohl Ihren Router als auch verbundene Geräte zu schützen.
Detaillierte Anweisungen finden Sie unter Security.
Auf der Seite NAT Mode können Sie die Funktionen Full Cone NAT und SIP ALG aktivieren oder deaktivieren.
Zum Einrichten der NAT-Einstellungen lesen Sie bitte NAT Mode.
Anwendungen
Ein Plug-in ist eine Softwarekomponente, die einem bestehenden Computerprogramm bestimmte Funktionen oder Erweiterungen hinzufügt und so dessen Anpassung und Erweiterung ermöglicht.
Zum Einrichten von Plug-ins lesen Sie bitte Plug-ins.
Dynamic DNS (DDNS) erkennt und aktualisiert automatisch die mit einer Domain verknüpfte IP-Adresse in Echtzeit. Dies ist besonders nützlich für Benutzer, die für den Zugriff auf ein entferntes Netzwerk eine statische IP-Adresse benötigen.
Zum Einrichten von Dynamic DNS lesen Sie bitte Dynamic DNS.
Network Storage bezeichnet eine zentrale Datenspeicherlösung, die es mehreren Benutzern und Geräten ermöglicht, über ein Netzwerk auf Dateien zuzugreifen und sie gemeinsam zu nutzen.
Zum Einrichten von Network Storage lesen Sie bitte Network Storage.
AdGuard Home ist eine netzwerkweite Lösung zum Blockieren von Werbung und Trackern, die als DNS-Server fungiert, um unerwünschte Inhalte auf allen Geräten eines Heimnetzwerks zu filtern.
Zum Einrichten von AdGuard Home lesen Sie bitte AdGuard Home.
ZeroTier ist eine Software-defined-Networking-Lösung, mit der Benutzer sichere virtuelle Netzwerke über das Internet erstellen können, sodass Geräte miteinander verbunden werden, als befänden sie sich im selben lokalen Netzwerk.
Zum Einrichten von ZeroTier lesen Sie bitte ZeroTier.
Tailscale ist ein VPN-Dienst, mit dem Sie von überall auf Ihre Geräte und Anwendungen zugreifen können.
Zum Einrichten von Tailscale lesen Sie bitte Tailscale.
Tor, kurz für The Onion Router, ist ein auf Privatsphäre ausgerichtetes Netzwerk, das anonyme Kommunikation über das Internet ermöglicht. Es leitet den Internetverkehr über eine Reihe von freiwillig betriebenen Servern (Nodes), um den Standort und die Nutzung des Benutzers zu verschleiern und Online-Aktivitäten nur schwer nachvollziehbar zu machen.
Zum Einrichten von Tor lesen Sie bitte Tor.
System
Die Seite Overview bietet einen umfassenden Überblick über den aktuellen Status und die Leistungsdaten Ihres Routers. Auf dieser Seite können Sie Folgendes anzeigen:
- CPU Average Load: Überwachen Sie die durchschnittliche Auslastung der Router-CPU, um die Leistung zu bewerten und mögliche Engpässe zu erkennen.
- Memory Usage: Prüfen Sie, wie viel Arbeitsspeicher Ihres Routers aktuell genutzt wird, um Ressourcen besser zu verwalten.
- LED Control: Schalten Sie die LED-Anzeigen des Routers ein oder aus, um die optischen Signale des Geräts anzupassen.
- Flash Usage: Sehen Sie die Auslastung des Flash-Speichers Ihres Routers ein, damit ausreichend Platz für Firmware- und Konfigurationsdaten verfügbar bleibt.
- Device Info: Greifen Sie auf detaillierte Systeminformationen Ihres Routers zu, darunter Uptime, Hostname, Modell, Architektur, OpenWrt-Version, Kernel-Version, Geräte-ID, Geräte-MAC und Geräte-S/N.
- External Storage: Prüfen Sie den Status externer Speichergeräte, die mit dem Router verbunden sind, z. B. USB-Laufwerke oder TF-Karten.
Diese Funktionen liefern wichtige Einblicke und Steuerungsmöglichkeiten, damit Sie den Betrieb Ihres Routers effektiv verwalten und überwachen können.
Detaillierte Anweisungen finden Sie unter Overview.
Auf der Seite Admin Password können Sie das Passwort für die Administrationsoberfläche des Routers festlegen oder ändern.
Das Admin-Passwort muss die folgenden Anforderungen erfüllen:
- Mindestens 10 und höchstens 63 Zeichen.
- Buchstaben (Groß- und Kleinschreibung wird unterschieden), Zahlen und Symbole
! @ # $ % ^ & * ( ) _ + - = , . > < | ? / \ [ ] { } : ; " ' ` ~sind zulässig. - Mindestens zwei der folgenden Kategorien sind erforderlich: Großbuchstaben, Kleinbuchstaben, Zahlen und Symbole.
Auf der Seite Upgrade können Sie die Firmware Ihres Routers auf die neueste Version aktualisieren, um bessere Leistung, mehr Sicherheit und neue Funktionen zu erhalten. Diese Seite bietet zwei Upgrade-Optionen:
- Firmware Online Upgrade: Prüfen Sie automatisch auf die neueste Firmware-Version und installieren Sie sie direkt vom Server des Herstellers, um den Aktualisierungsprozess zu vereinfachen.
- Firmware Local Upgrade: Laden Sie manuell eine Firmware-Datei von Ihrem Computer hoch, um den Router zu aktualisieren, und behalten Sie dabei die Kontrolle über Version und Zeitpunkt des Upgrades.
Mit diesen Optionen halten Sie Ihren Router auf dem neuesten Stand und profitieren von aktuellen Verbesserungen und Fehlerbehebungen.
Detaillierte Anweisungen finden Sie unter Upgrade.
Auf der Seite Scheduled Tasks können Sie Ihren Router so konfigurieren, dass er in festgelegten Intervallen automatisch neu startet, um Leistung und Stabilität aufrechtzuerhalten.
Detaillierte Anweisungen finden Sie unter Scheduled Tasks.
Hinweis: Mudi 7 unterstützt weder einen Zeitplan für die LED-Anzeige noch einen Zeitplan für den Wi-Fi-Status.
Auf der Seite Display Management können Sie das Touchscreen-Display und die zugehörigen Einstellungen verwalten.
- Wallpaper: Passen Sie Hintergrundbild und Stil des Wake-Displays an.
- Brightness: Stellen Sie die Helligkeit des Touchscreens ein. Verwenden Sie den Schieberegler oder geben Sie einen Prozentwert ein, um sie an unterschiedliche Lichtverhältnisse anzupassen.
- Personalised Signature: Fügen Sie dem Touchscreen einen benutzerdefinierten Text hinzu, um Ihren eigenen Stil zu zeigen oder das Gerät schnell zu identifizieren.
- Auto Lock: Legen Sie die Verzögerung fest, nach der sich der Bildschirm bei Inaktivität automatisch sperrt. Der Bereich reicht von 15 Sekunden bis 5 Minuten.
- Passcode: Legen Sie einen Passcode für den Touchscreen fest, um eine zusätzliche Sicherheitsebene hinzuzufügen.
Detaillierte Anweisungen finden Sie unter Display Management.
Auf der Seite USB & Power können Sie USB-bezogene Einstellungen und die Energieverwaltung Ihres Routers konfigurieren, z. B. USB-Protokoll, Stromrichtung, Leerlauf-Timeouts und Standby-Verhalten.
Detaillierte Anweisungen finden Sie unter USB & Power.
Auf der Seite Time Zone können Sie die korrekte Zeitzone für Ihren Router festlegen, damit alle Zeitpläne, Protokolle und Systemereignisse präzise mit Ihrer Ortszeit versehen werden. Diese Einstellung ist wichtig für genaue Aufzeichnungen und die korrekte Ausführung zeitbasierter Konfigurationen.
Detaillierte Anweisungen finden Sie unter Time Zone.
Auf der Seite Reset Firmware können Sie die aktuell installierte Firmware-Version Ihres Routers auf ihre Standardeinstellungen zurücksetzen, wodurch alle benutzerdefinierten Konfigurationen gelöscht werden. Dabei wird der Router auf die Standardeinstellungen der derzeit installierten Firmware-Version zurückgesetzt. Das ist hilfreich, um hartnäckige Probleme zu beheben oder mit der Standardkonfiguration der aktuellen Firmware neu zu beginnen.
Detaillierte Anweisungen finden Sie unter Reset Firmware.
Auf der Seite Log erhalten Sie Zugriff auf verschiedene Protokolle, die die Aktivitäten und Ereignisse des Routers aufzeichnen und so die Fehlerbehebung sowie Leistungsüberwachung unterstützen. Diese Seite umfasst:
- System Log: Detaillierte Protokolle von Systemereignissen und -aktivitäten.
- Kernel Log: Protokolle zu Vorgängen und Ereignissen des Kernels.
- Crash Log: Aufzeichnungen von Systemabstürzen und Fehlern, die bei der Diagnose kritischer Probleme helfen.
- Cloud Log: Protokolle zu Interaktionen und Aktivitäten im Zusammenhang mit den in den Router integrierten GoodCloud-Diensten.
- Nginx Log: Protokolle des Nginx-Webservers, sofern dieser vom Router genutzt wird, mit Informationen zu Webverkehr und Serverbetrieb.
Zusätzlich verfügt die Seite über die Schaltfläche Export Log, mit der Sie alle gesammelten Protokolle zur Analyse durch den technischen Support exportieren können. Diese Funktion ist besonders hilfreich bei der Diagnose komplexer Probleme und beim Einholen professioneller Unterstützung.
Detaillierte Anweisungen finden Sie unter Log.
Auf der Seite Advanced Settings erhalten erfahrene Benutzer über die OpenWrt-LuCI-Oberfläche Zugriff auf erweiterte Konfigurationsoptionen, um Routereinstellungen und Funktionen über die grundlegenden Oberflächenoptionen hinaus fein abzustimmen. Dazu gehören detaillierte Netzwerkkonfigurationen, Firewall-Einstellungen und weitere erweiterte Systemanpassungen.
Detaillierte Anweisungen finden Sie unter Advanced Settings.